superfluid
Well-Known Member
- Joined
- Mar 29, 2021
- Threads
- 20
- Messages
- 290
- Reaction score
- 923
- Location
- Austin, TX
- Vehicles
- Rivian R1S, Kia Telluride
- Occupation
- Tech and data
- Thread starter
- #1
Hey all,
Been seeing a lot of frustration with the Gen 2 sound system, particularly after the last update, 2025.34.30.
Since I haven't been able to coordinate with a Gen 2 owner to measure system performance and make recommendations, I thought I'd offer a way to improve your sound yourself. This method works for any sound system with an EQ you can adjust.

Donated $3 to photographer Tima Miroshnichenko for using this photo.
Procedure
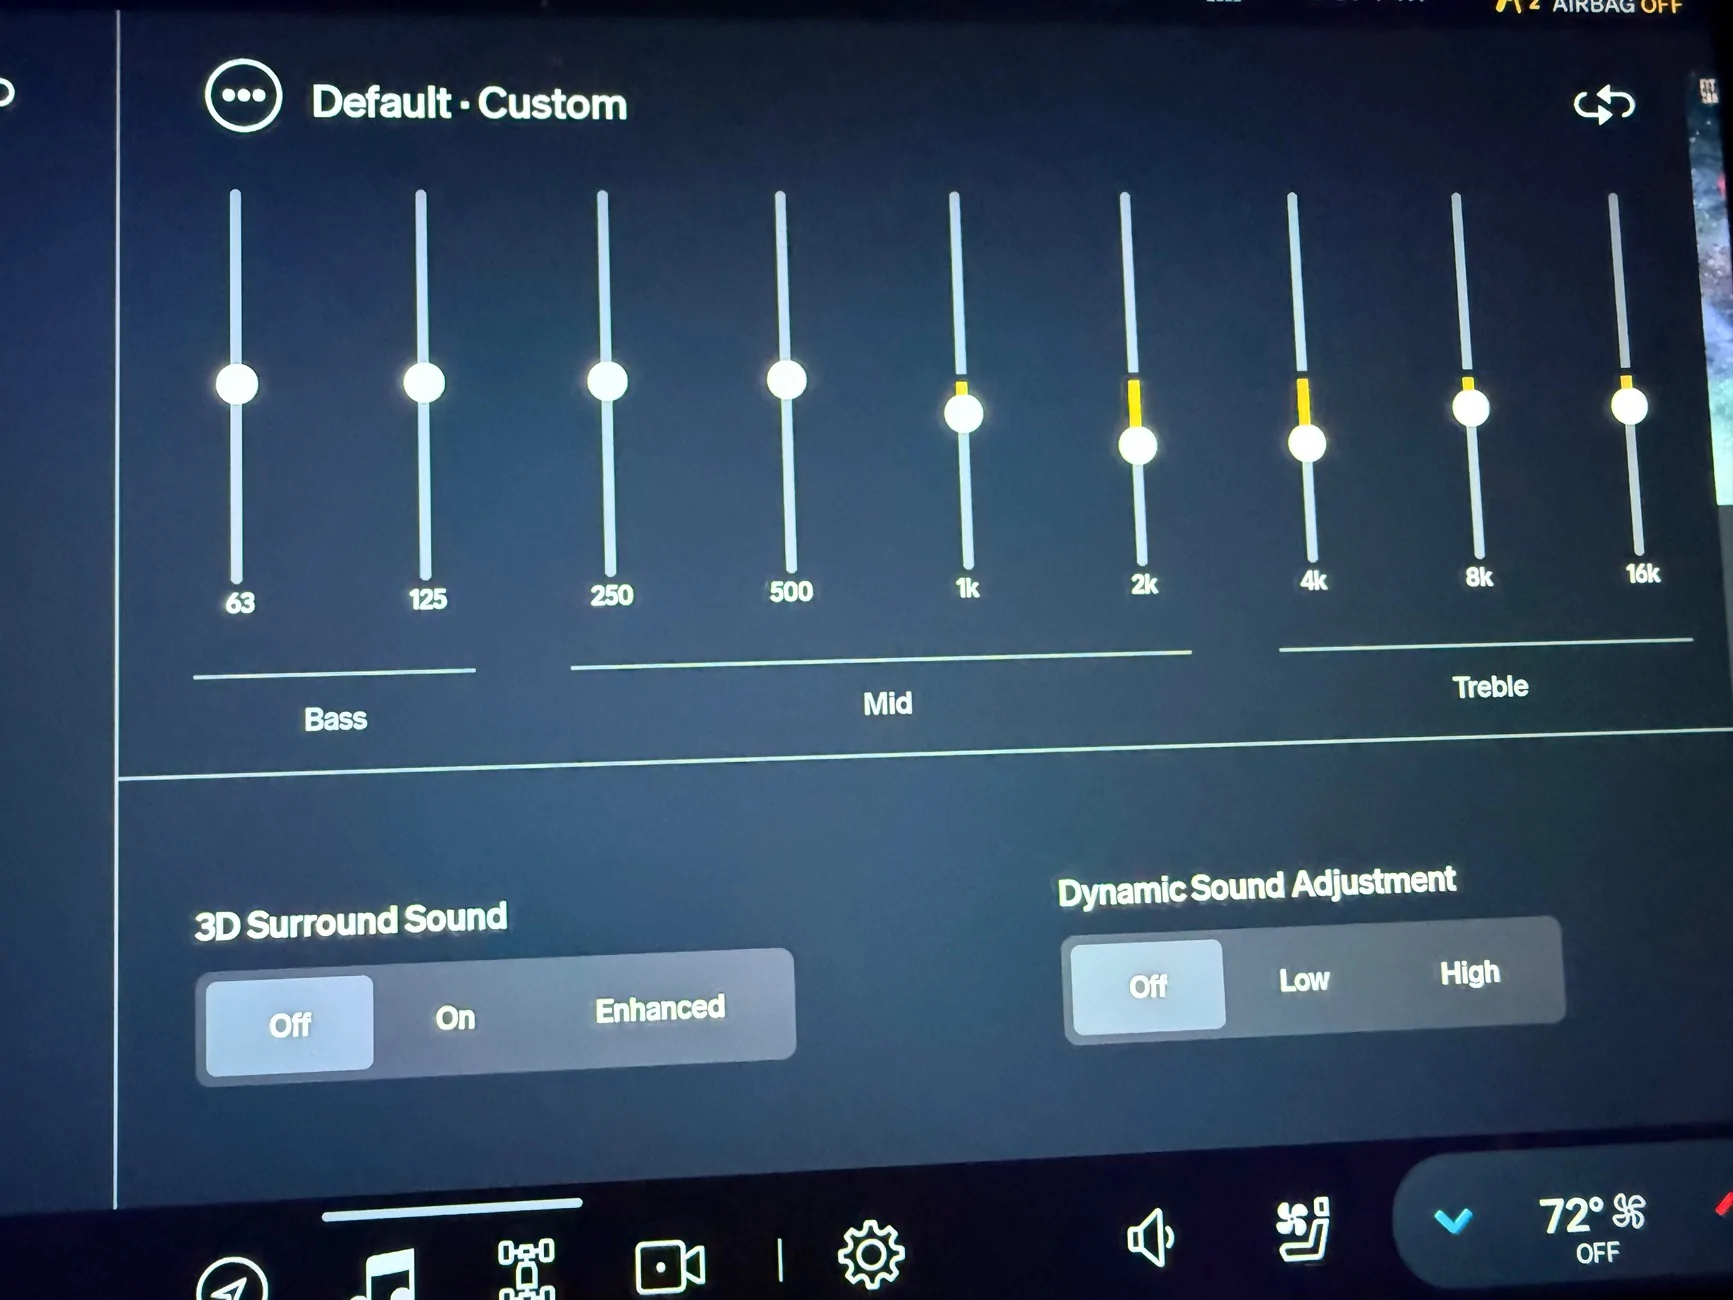
Please share screenshots of your EQ profiles for others to try.
If you enjoyed this post or it helped you get a better result, I'd appreciate a cool cup of sake to weather this Texas heat.
Kampai!
Been seeing a lot of frustration with the Gen 2 sound system, particularly after the last update, 2025.34.30.
Since I haven't been able to coordinate with a Gen 2 owner to measure system performance and make recommendations, I thought I'd offer a way to improve your sound yourself. This method works for any sound system with an EQ you can adjust.

Donated $3 to photographer Tima Miroshnichenko for using this photo.
Procedure
- Select a Custom EQ profile slot. The latest update lets us save two custom profiles, an oft-requested feature. You'll save your new EQ profile to it for future recall. Thanks, Rivian!
- Reset your EQ to flat.
- Turn off Dynamic Sound Adjustment and 3D Surround Sound.
- Reset Fade and Balance to center.
- Determine whether you listen to more Dolby Atmos or stereo tracks. In my experience, Dolby Atmos and stereo tracks tend to benefit from slightly different EQ settings, primarily in the bass region. We'll optimize for the format you listen to the most. If you're 50/50 or don't know/care, I suggest going with stereo because more tracks were/are mixed in stereo.
- Reference a favorite song with vocals. Sitting in a quiet place with windows up and A/C on Low or Off, play your favorite vocal-based song on repeat. Choose the Dolby Atmos or stereo version depending on which format you listen to more. Play it at a level where you can pay attention to the quieter parts of the song, like reverb tails and finger picks, without hurting your ears. We use a song with vocals because our ears and brains are the most sensitive to the vocal range, 1-4 kHz, the range that carries the most information we care about—vocal communication with other people. If you don't have a track handy, I recommend Adele's Send My Love (stereo) through a streaming app at the highest quality (e.g., Spotify, TIDAL, Apple Music) instead of Bluetooth, which reduces a ton of resolution. I like this song because Adele's vocals are excellent and the mix is simple, which helps you hear the effect of the changes you make.
- Center on vocals. EQ the 1 kHz, 2 kHz, and 4 kHz bands up and/or down until the vocals sound "natural". Try to ignore surrounding instruments like kick drums, rhythm guitar, and hi-hats as much as you can. Closing your eyes helps. "Natural" means the vocals sound as clear and as pleasant as you can get them without them "leaving" the mix. Boost 2 kHz to the max to hear what "leaving the mix" means. (An analog would be brighting someone's face in a photo to the point you can see it clearly but it doesn't look copy/pasted onto the photo. We brighten faces because the face usually carries the most information we care about in a photo.) The vocal band is now your reference for all your other EQ adjustments. Note that cutting is better than boosting in most cases because boosting bands too high can cause digital distortion. Moreover, we have a tendency to boost one thing, feel like it sounds good but makes something else sounds too quiet. Then we boost that thing and then another until we end up boosting everything, which defeats the purpose of adjustments. If you want to boost something a lot (more than +4 notches) because you can't hear it well, try cutting the bands to the left and right of it instead. Once you get the vocals sounding decent, leave it alone and balance the bass.
- Balance the bass. Adjust the 63 Hz, 125 Hz, and 250 Hz bass bands to get the kick and low-end instruments in place relative to the vocals: Listen for the balance between the vocals and the bass and try to ignore everything else (synths, rhythm guitars, piano, etc). You're aiming to get the drums and bass instruments sounding clear and punchy without ringing or rattling. Once you get 63, 125, and 250 Hz dialed in, adjust the 500 Hz band up or down to cement the bass and vocal ranges together.
- Listen to more songs and tweak to taste. Now that the bass and vocals sound natural and enjoyable relative to each other, play a few other favorite songs and listen for how the vocals and bass sit together. If they sound good, dial in the 8 kHz+ bands to taste, being judicious about boosting in this region—a little goes a long way. For whatever reason, I typically have to cut 16 kHz in my Gen1 R1S Elevation by 4-6 notches. If they don't sound great, balance vocals and bass using your other favorite songs until they all sound reasonably good.
- Repeat for the other format. If you want a different EQ profile for Dolby Atmos and stereo, choose the second custom EQ slot and repeat the above using a reference track in that format. If you're looking for a reference Dolby Atmos track with vocals, try Billie Eilish's Bad Guy.
- Optional: Reenable Dynamic Sound Adjustment and/or 3D Surround Sound. If you like what those enhancements do, turn them back on. (I personally don't like what they do.)
Please share screenshots of your EQ profiles for others to try.
If you enjoyed this post or it helped you get a better result, I'd appreciate a cool cup of sake
to weather this Texas heat. Kampai!
Sponsored
")