Sponsored

EVSportline Aero Covers arrived...questions/thoughts

ElGuano

Well-Known Member
Joined
Oct 9, 2024
Threads
49
Messages
866
Reaction score
1,236
Location
Cali
Vehicles
R1T Trimax - Storm Blue, Driftwood, Sport Dark
I had pre-ordered the EVSportline aero covers a few months back when they were first announced; they seemed like a great way to retain the aero cover with their running boards, without having to cut the factory pieces.

I just received the aero covers and I'm having some second thoughts about installing them:

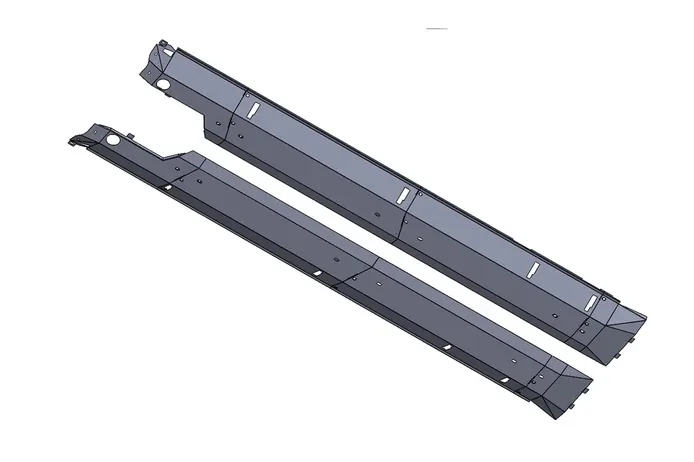
When I first pre-ordered, the design looked like one long plate per side. The final product is four separate plates per side, similar to the three-segment OEM plates. No real problem there, I can deal with a slightly more involved install.

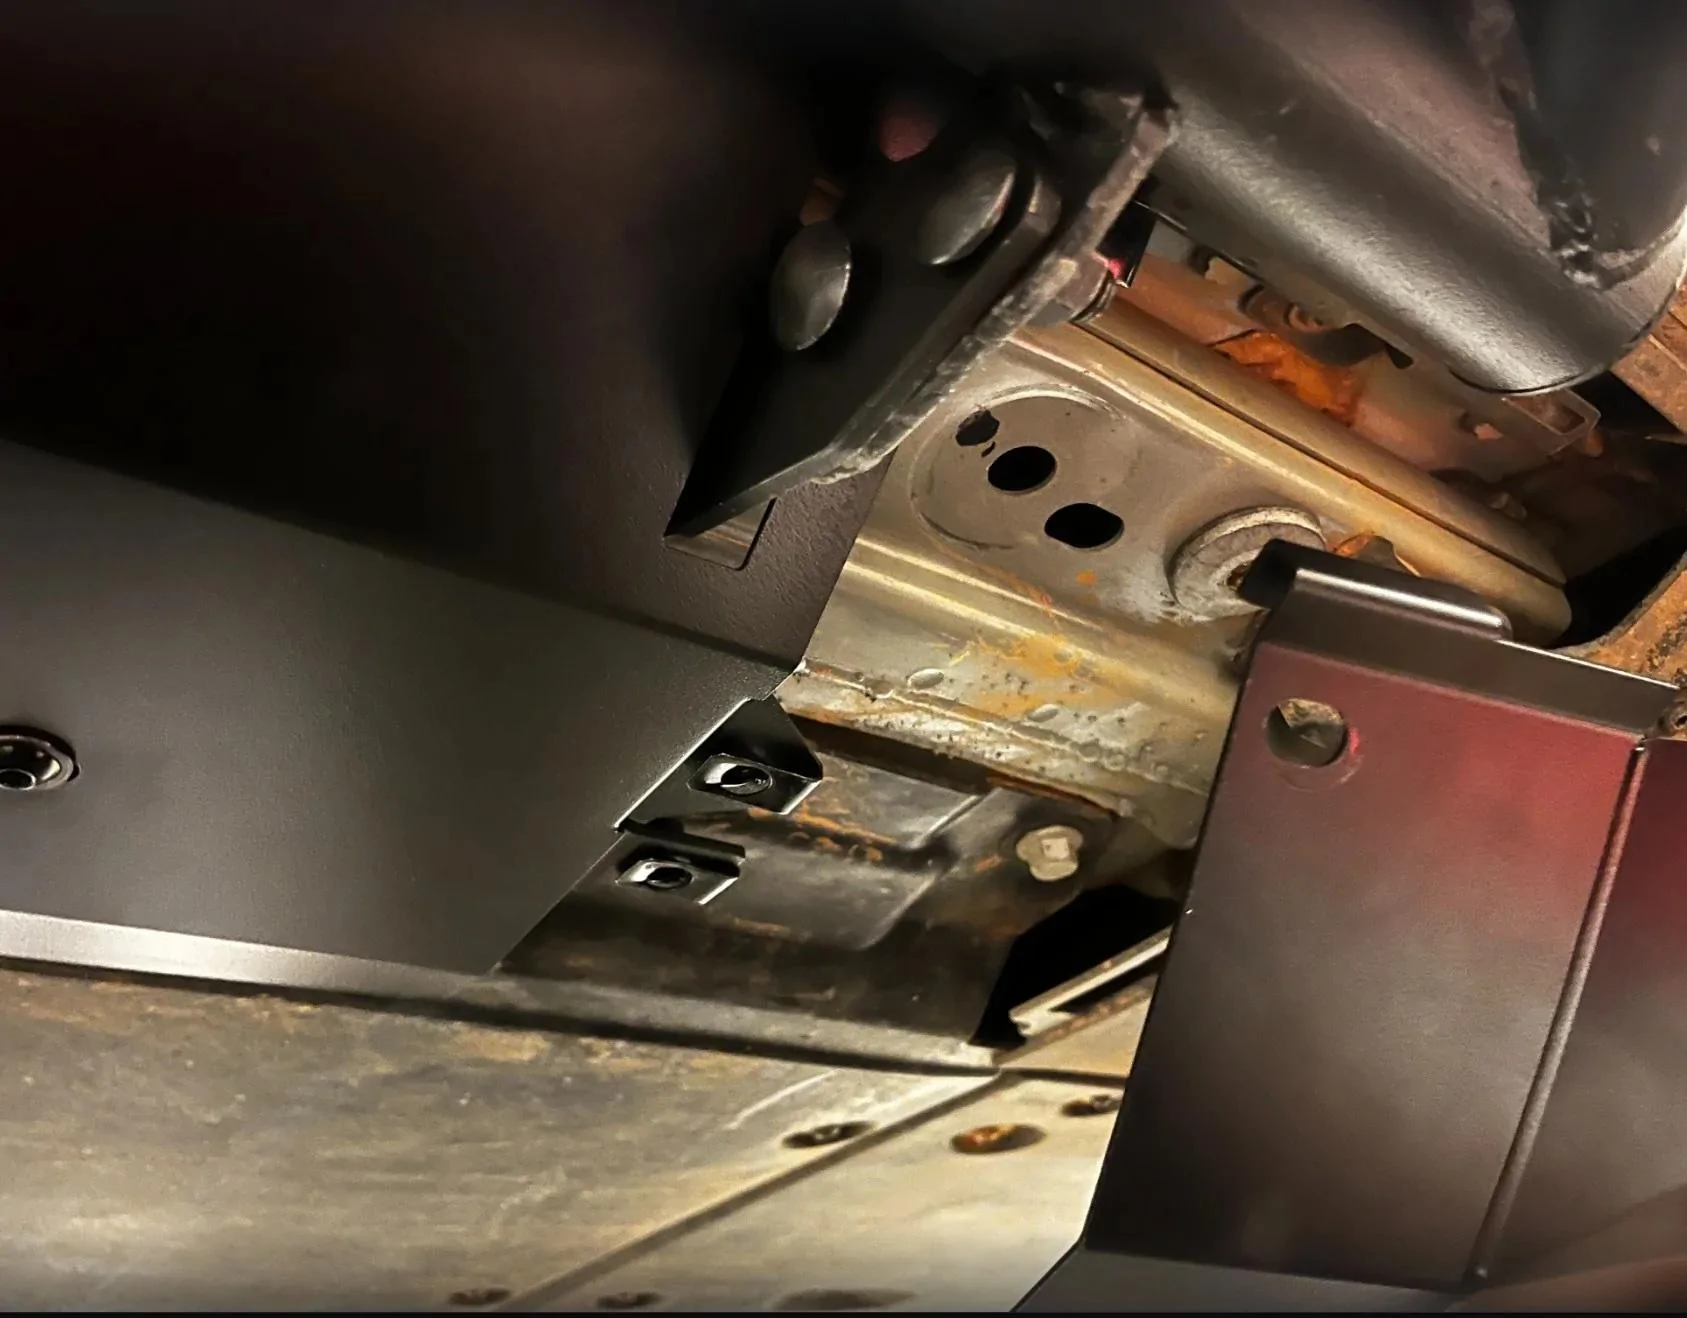
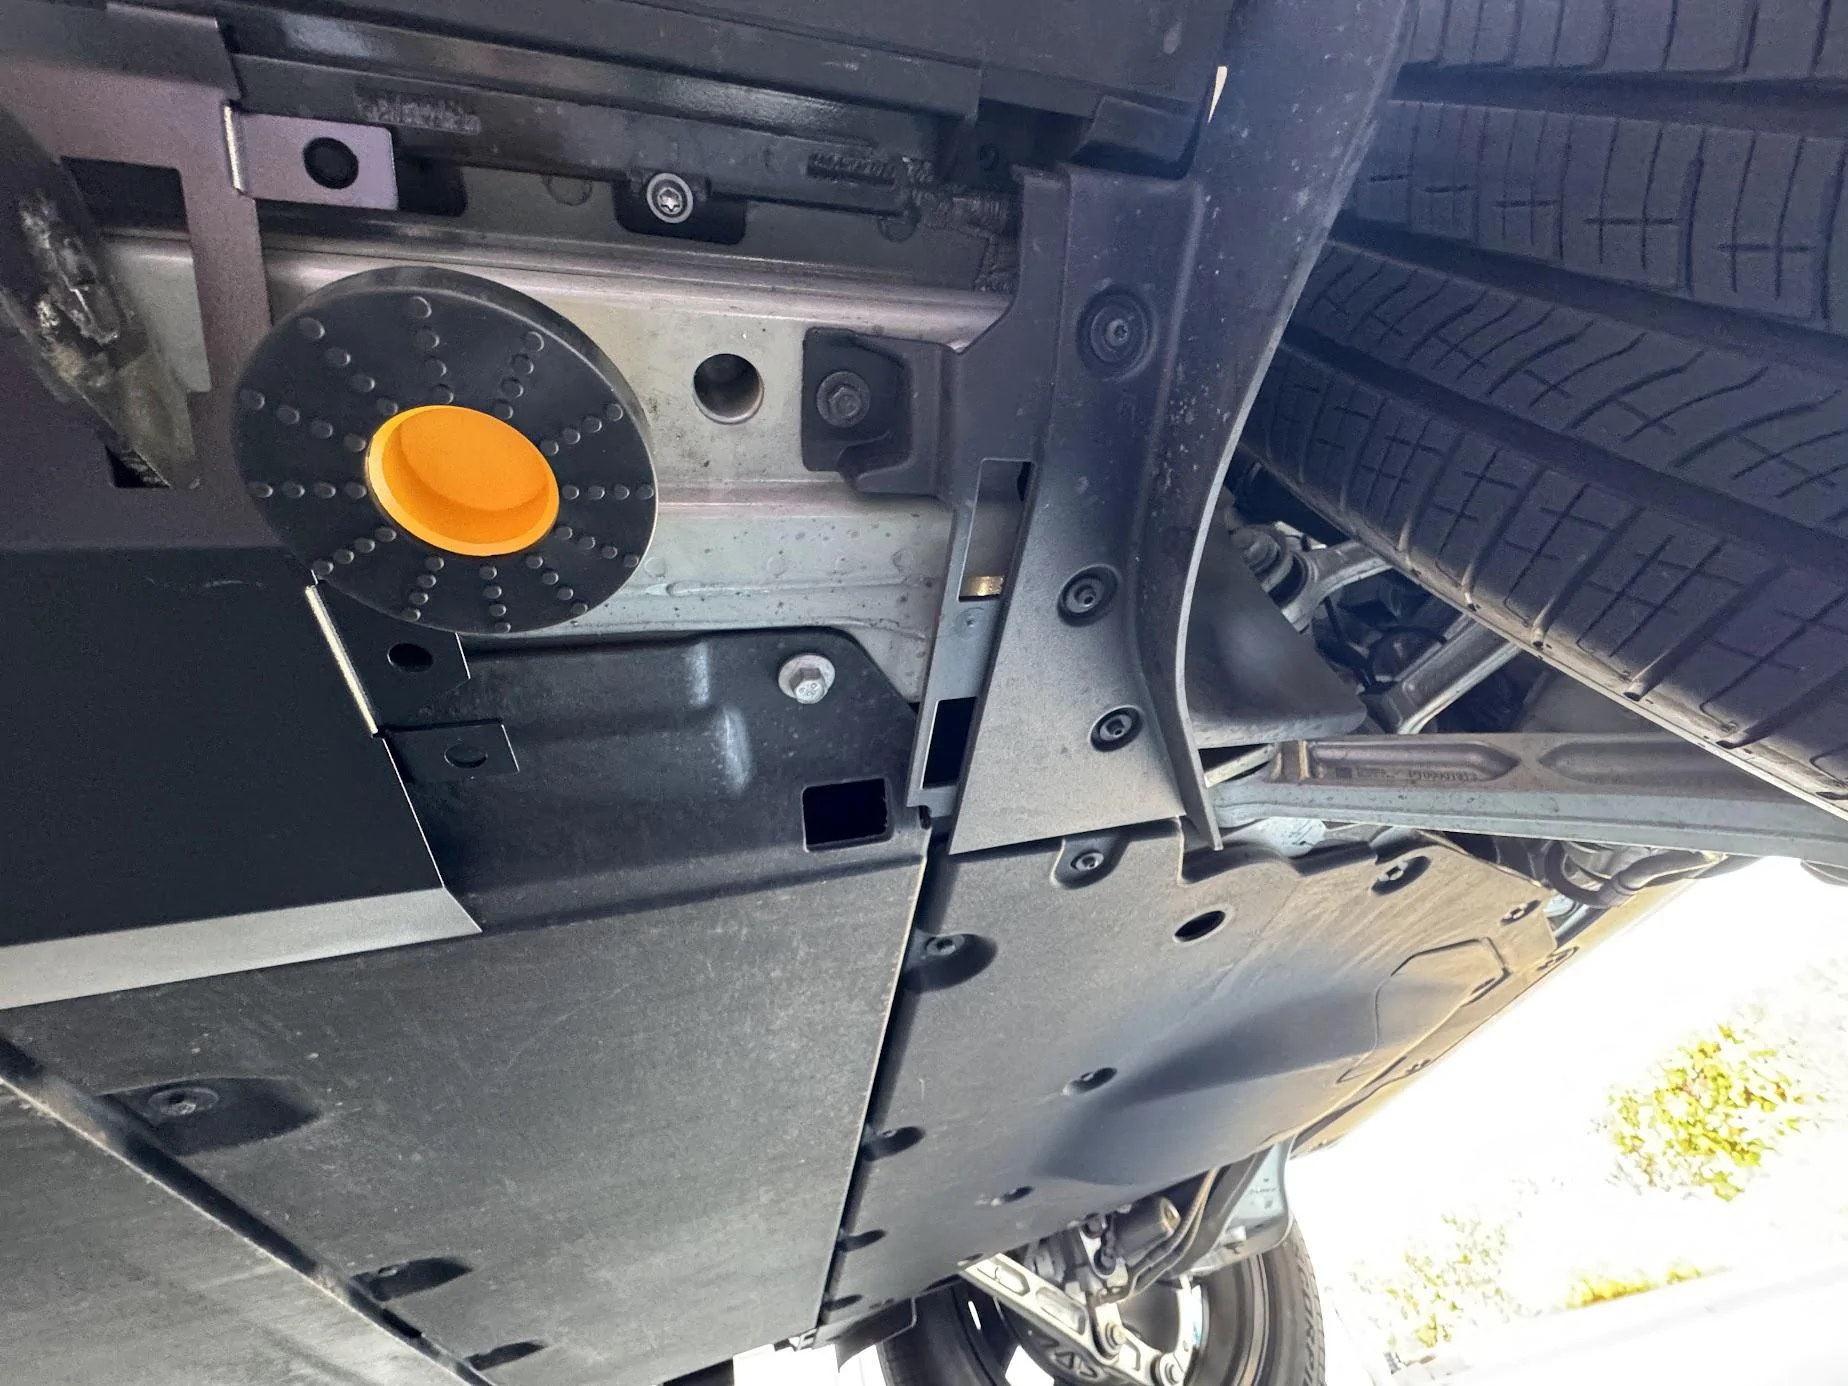
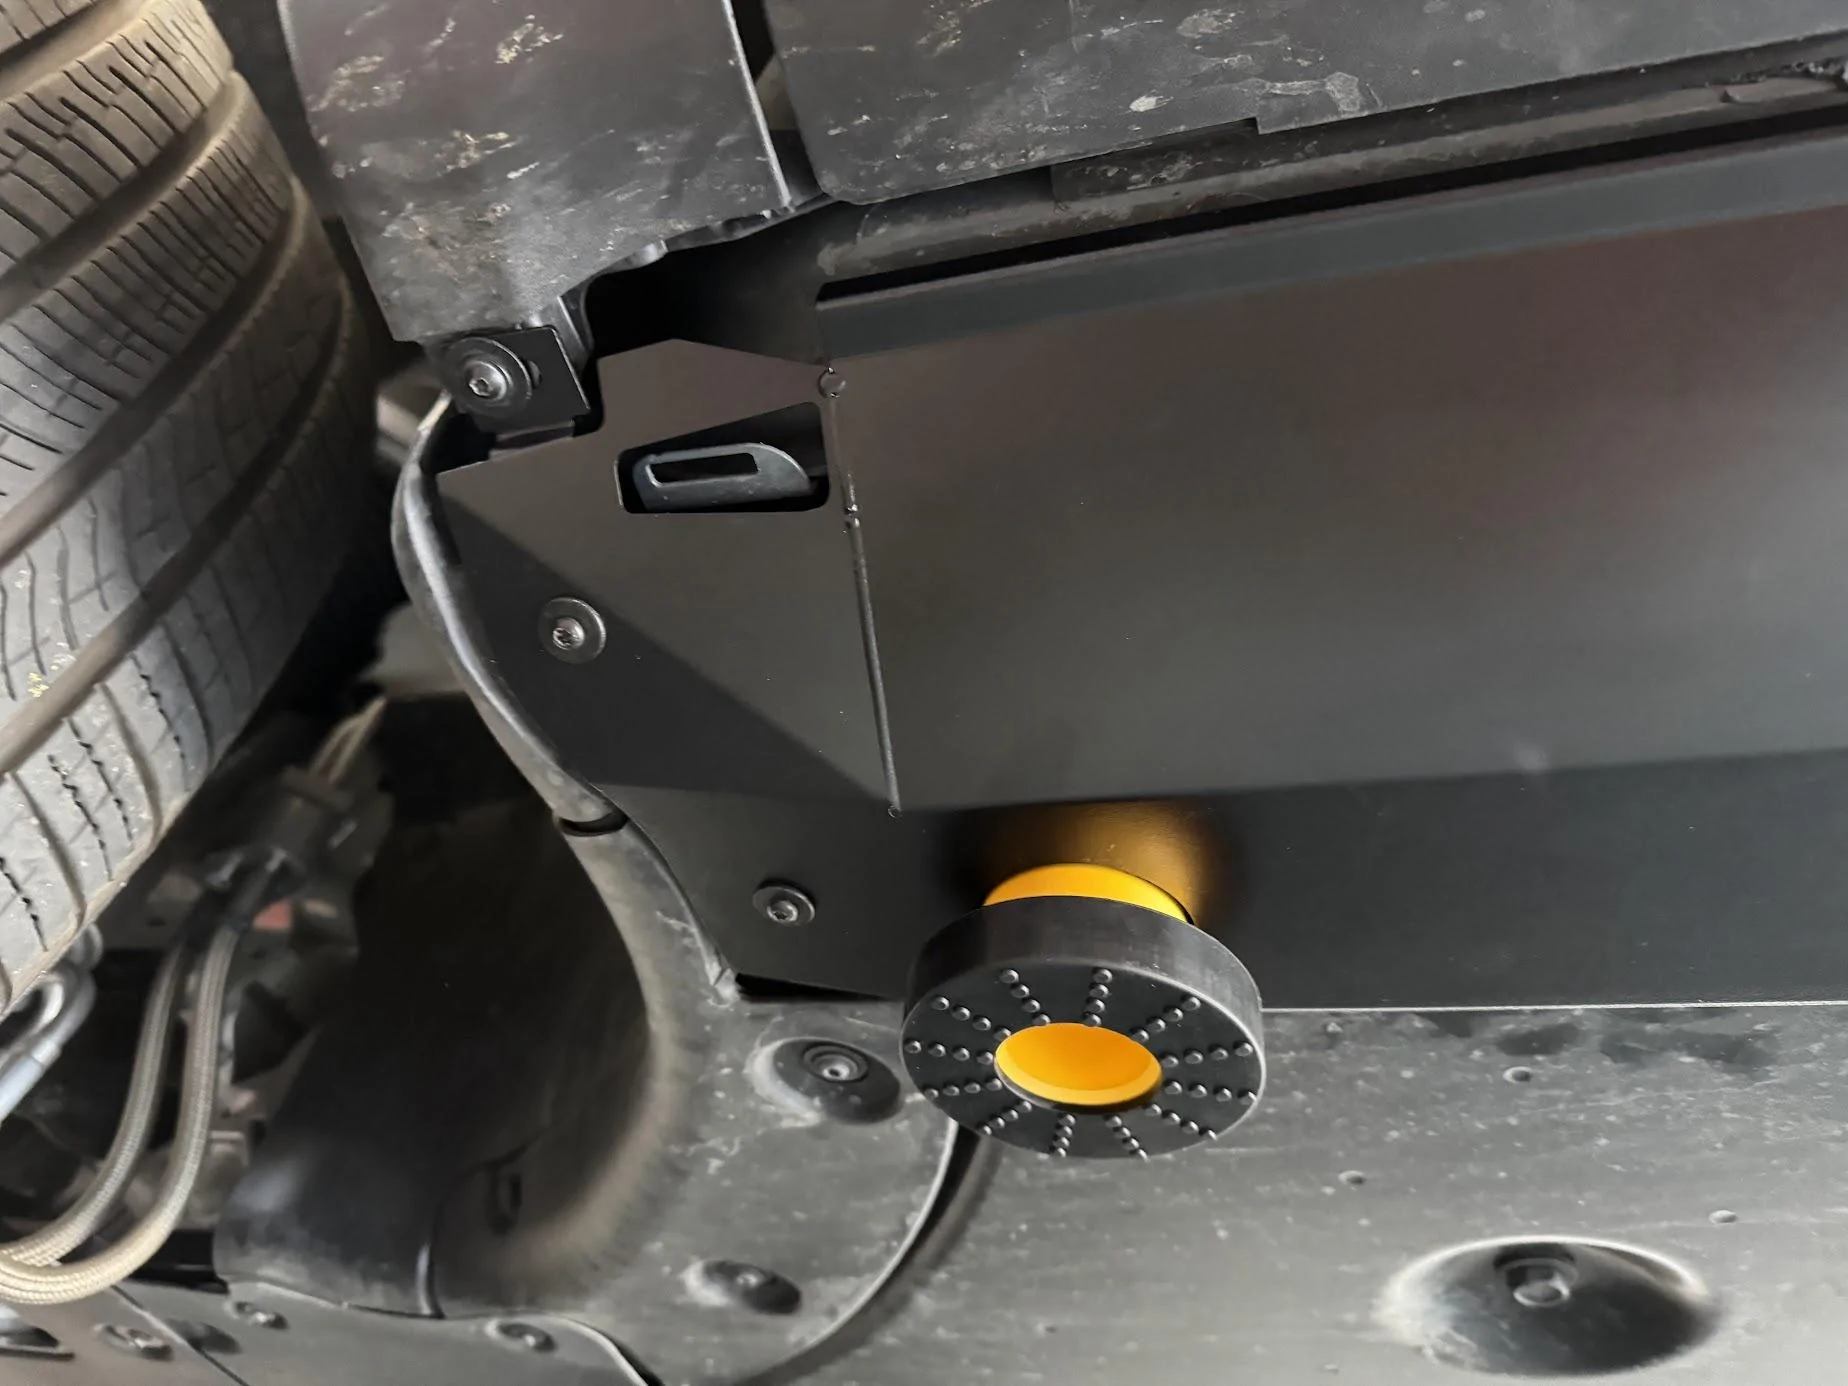
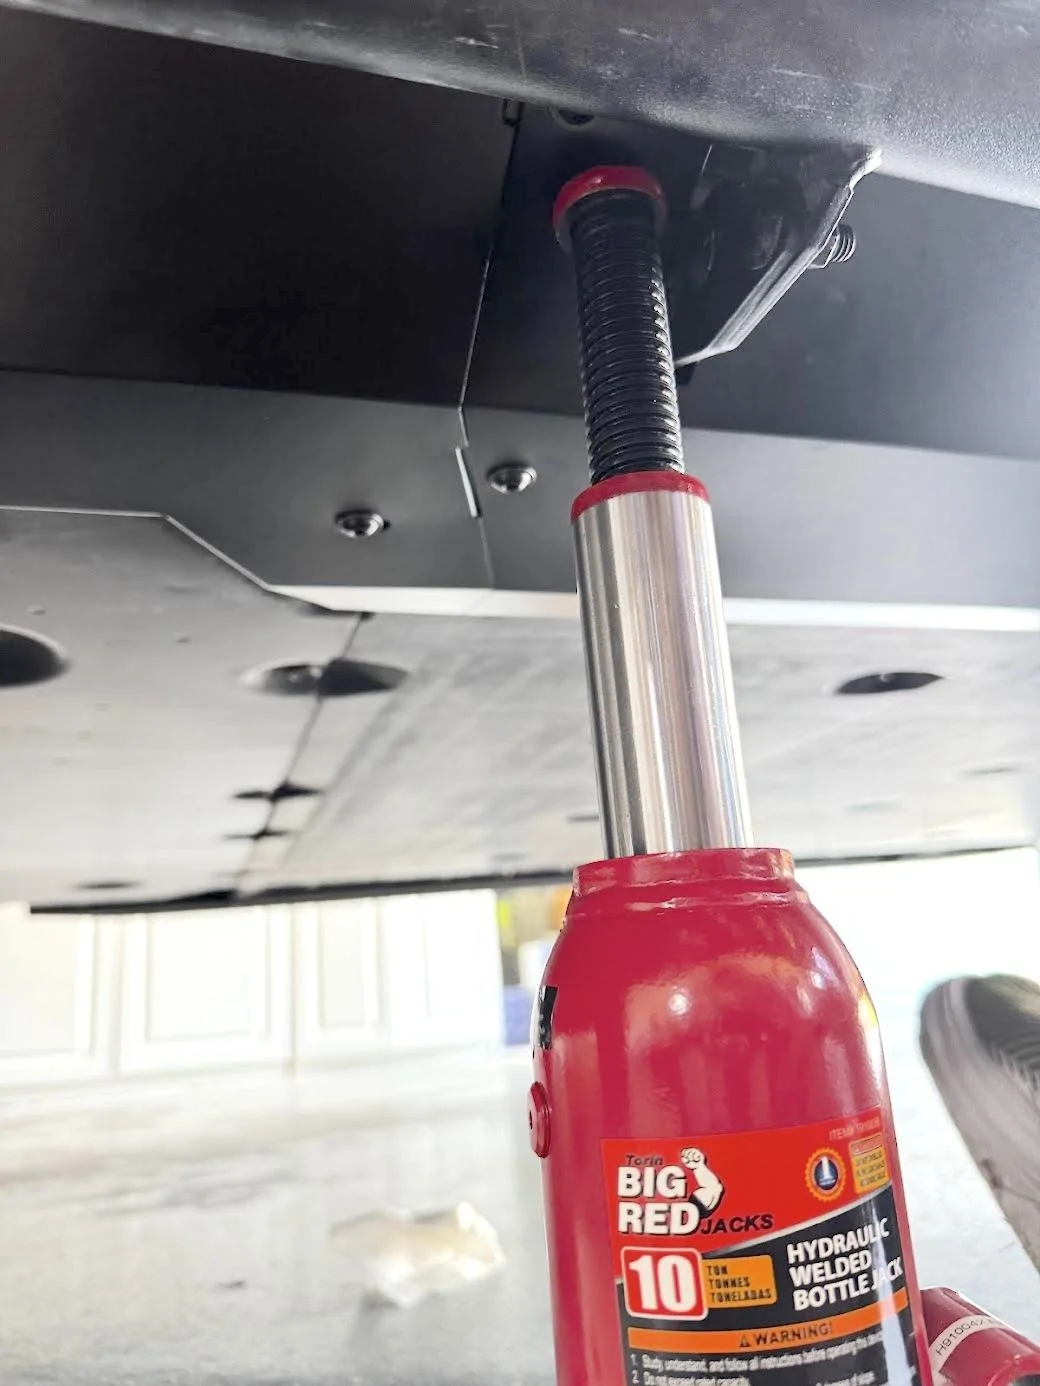
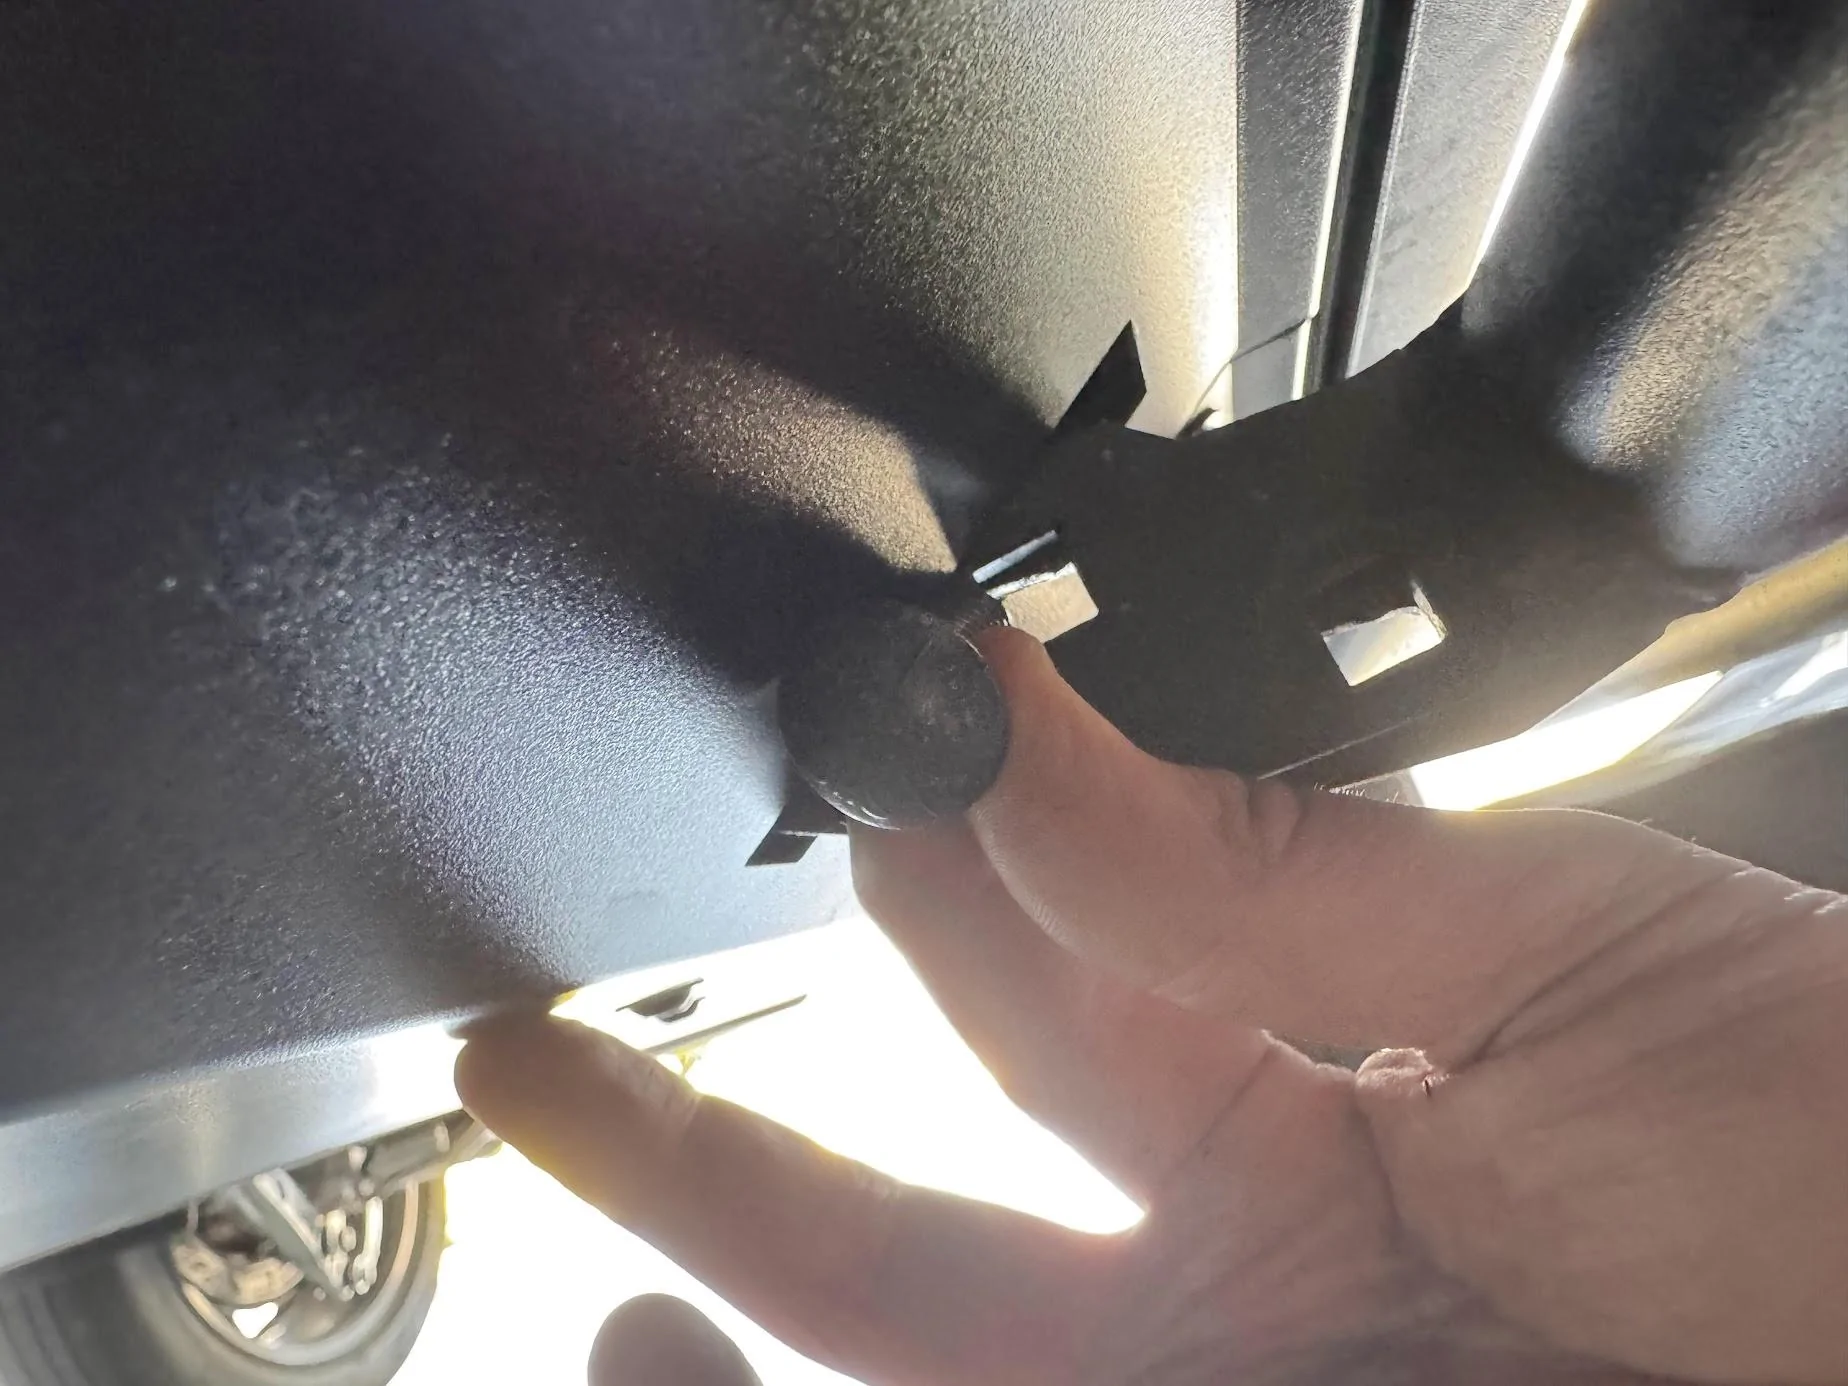
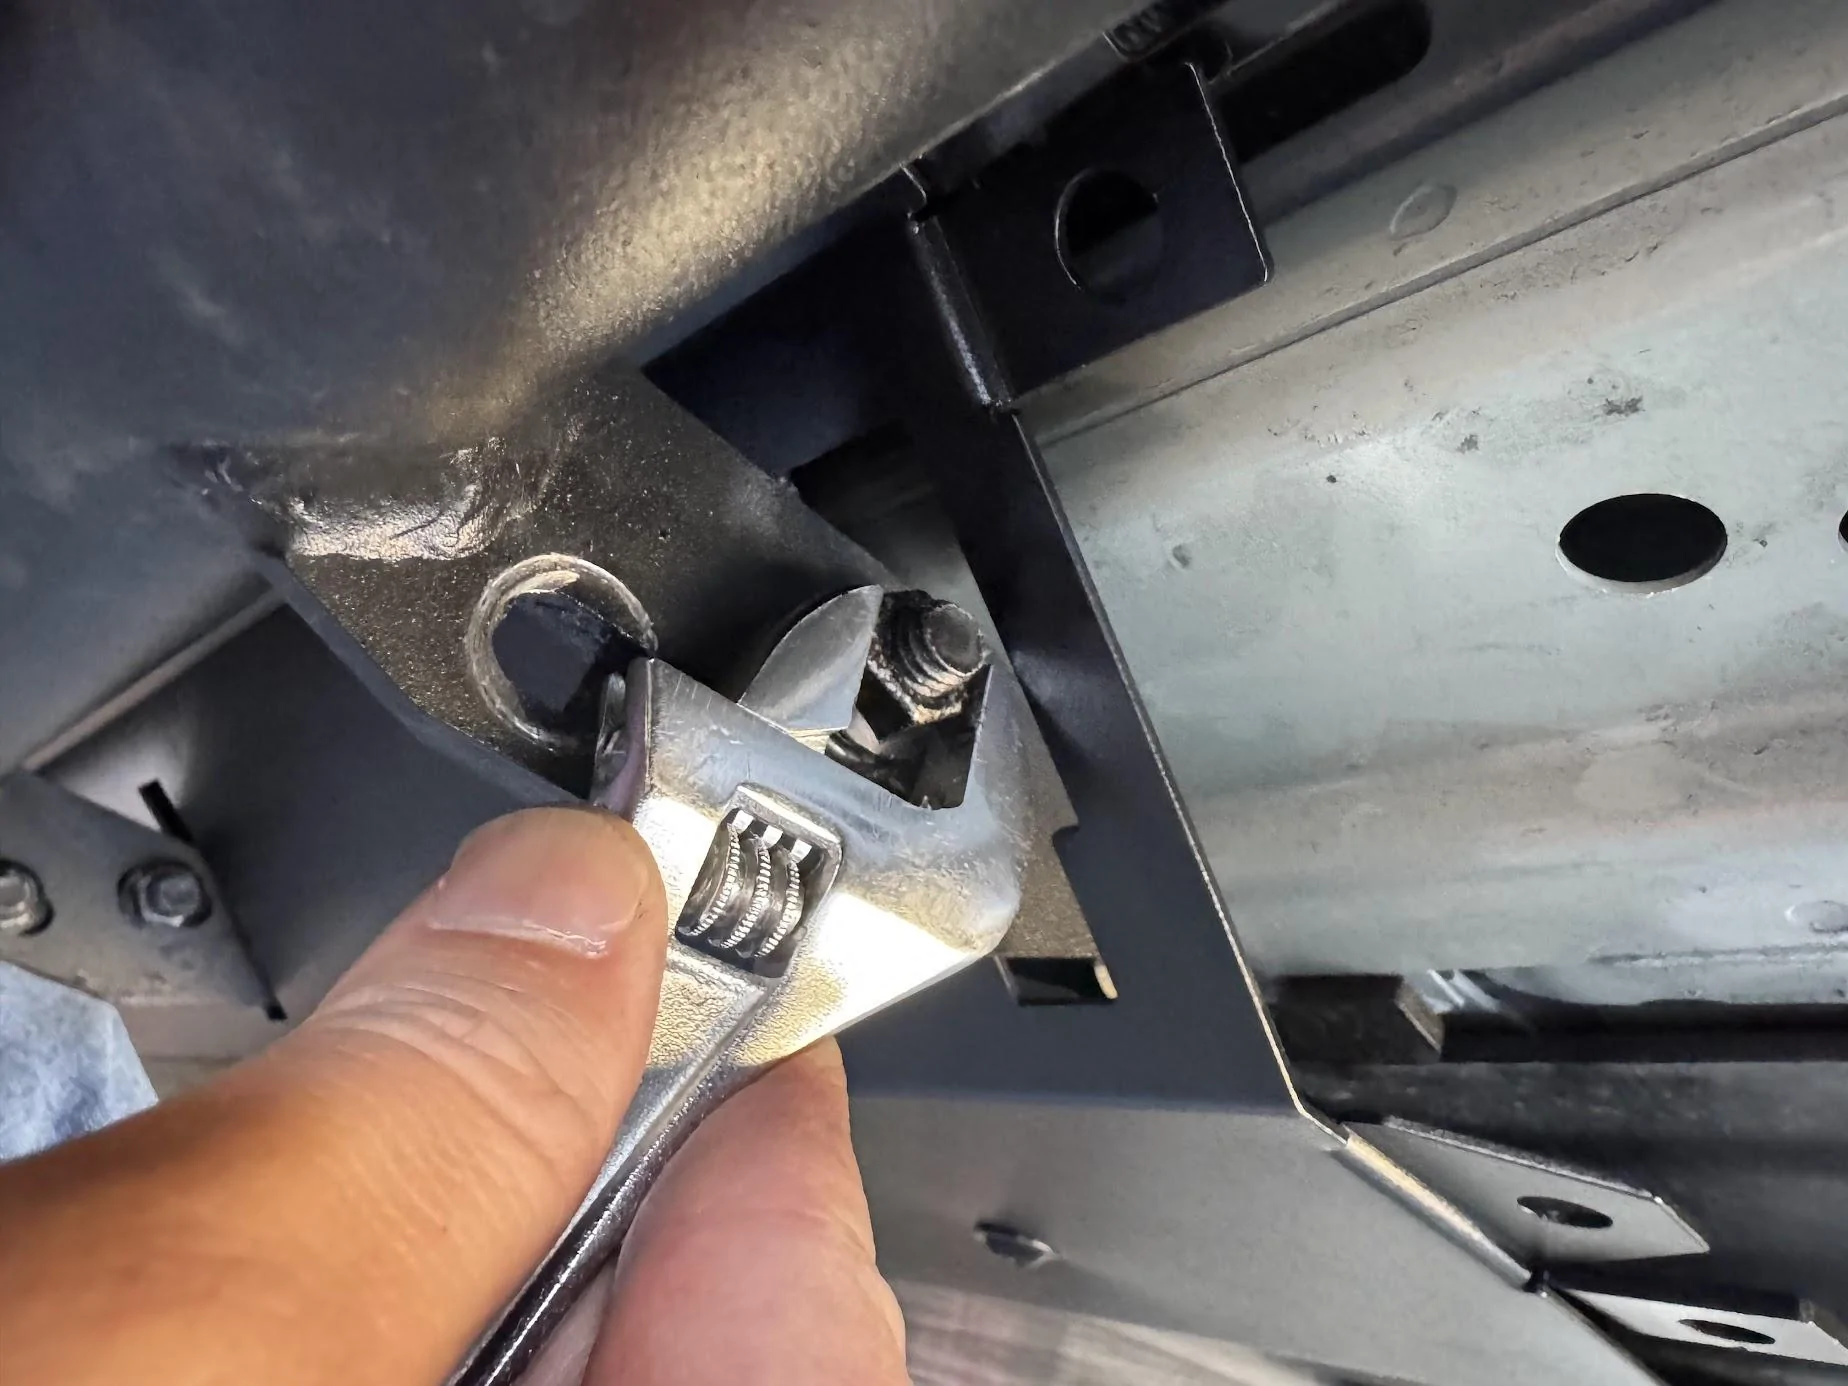
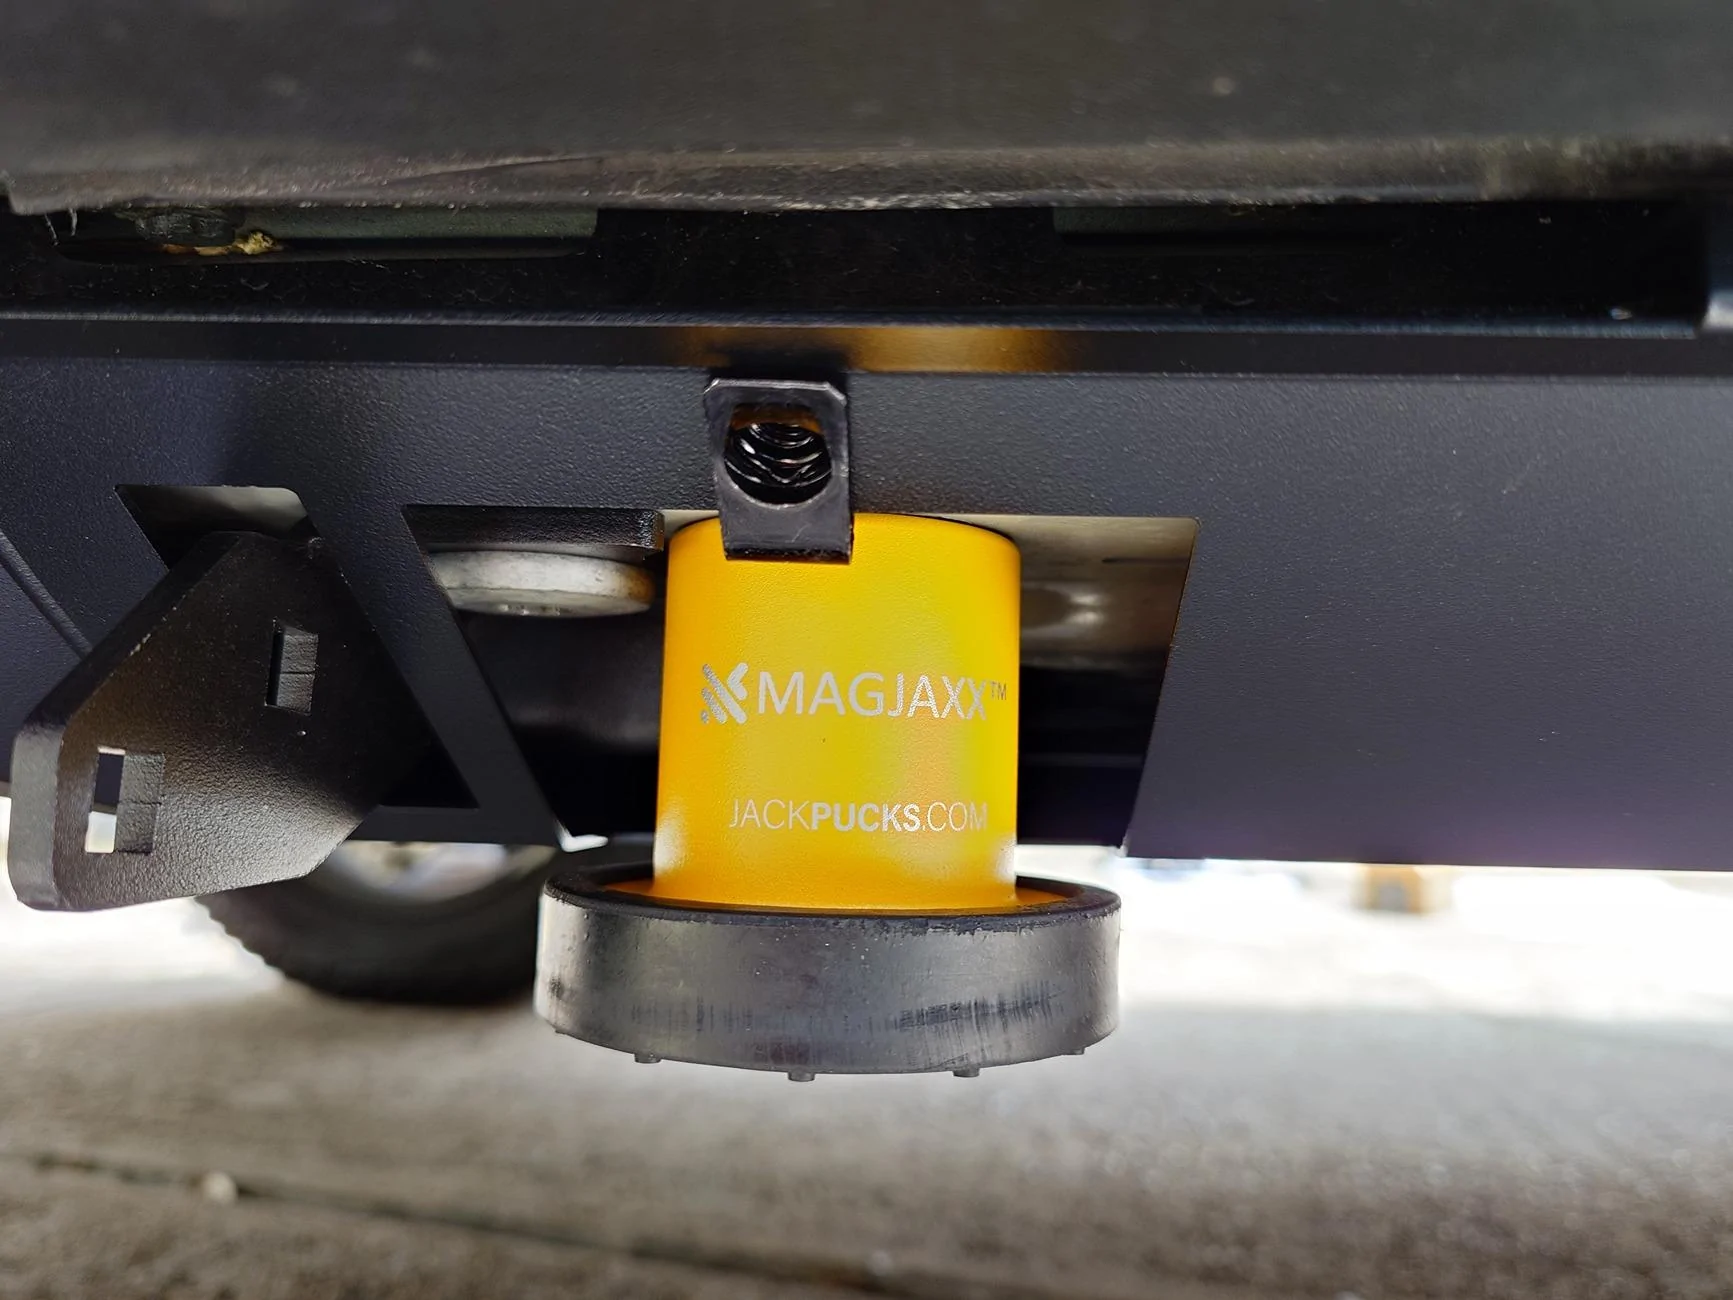
The thing that gives me the most pause is that for the R1T, it seems there is a round cutout for jack pucks, which is great! But for the rear, there is no jack puck cutout! It looks like the R1S version has a small hatch/plate that you can unscrew to access it, but the R1T version doesn't have even that. You need to remove 3 screws for the back aero cover and slide/rotate the piece off entirely to jack up the car. This is a bit inconvenient in the least, and also means I need to carry another hex driver in my spare kit set (one more tool to potentially lose when I need it the most). Also, it pretty much means whenever I bring the truck in for tire change or service, I've gotta remove this panel beforehand because there's no way a shop is going to know how to do that.

Has anyone installed this on the R1T? Is there an easier way to access the rear jack point? Maybe it's less of a deal than I think it will be? I'm actually contemplating installing it without that last panel. It's pretty small (less than 8" long) and having it off on the trailing end probably won't impact aero too much. Plus I've seen how much dirt gets into the aero panels and maybe it'll be better to have it open so all that stuff has somewhere to leave the bottom of the vehicle. Anyways, thoughts appreciated on this before I embark on an install...

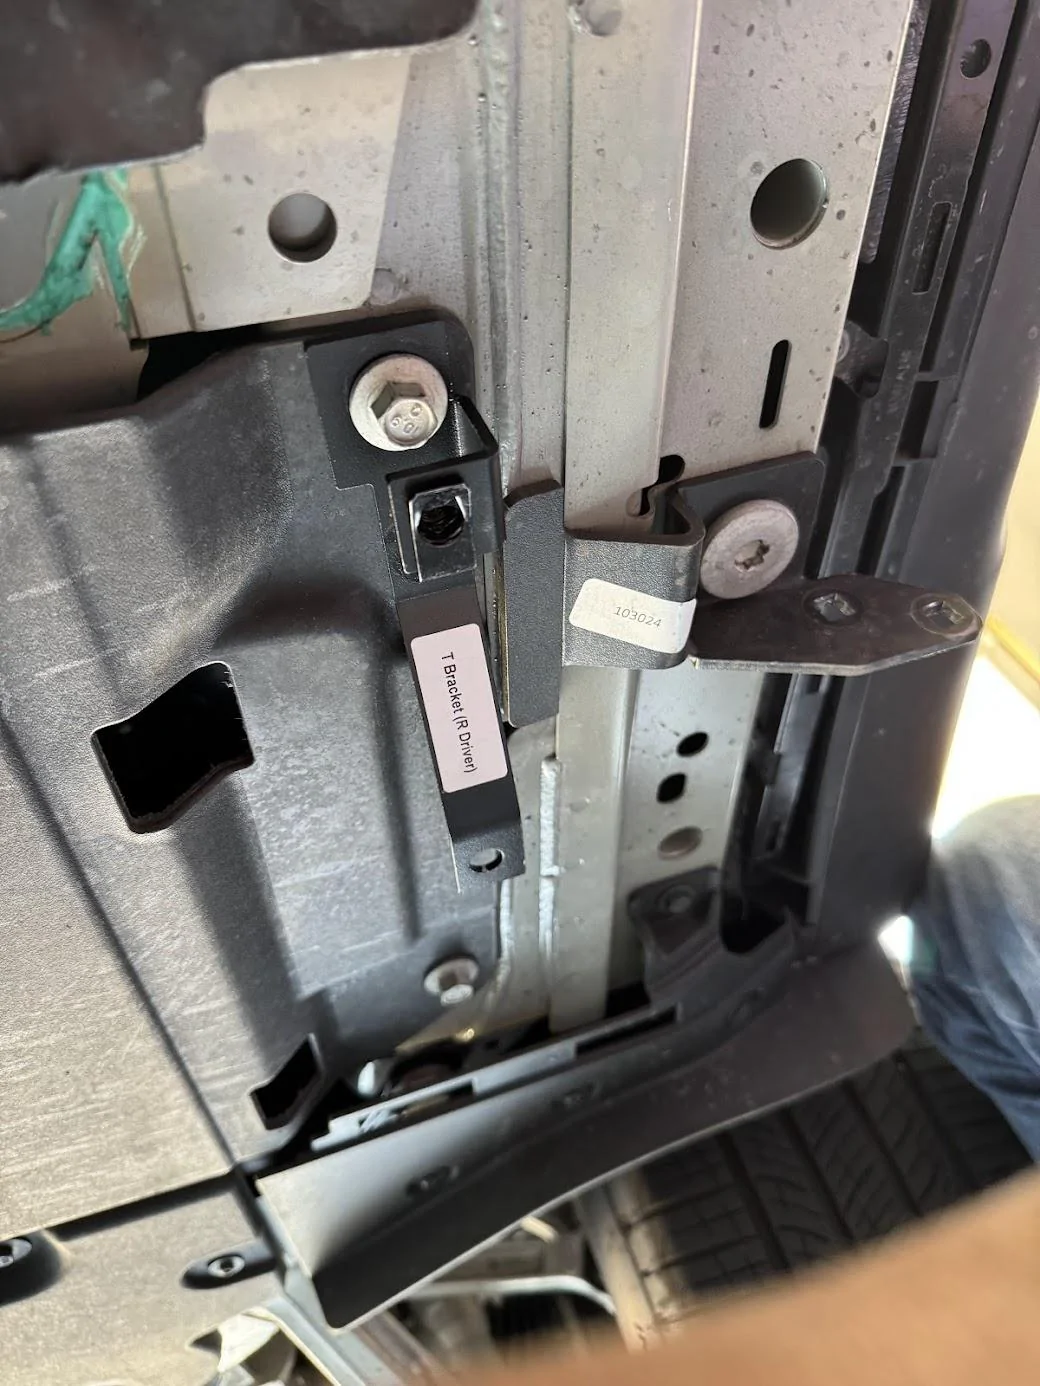
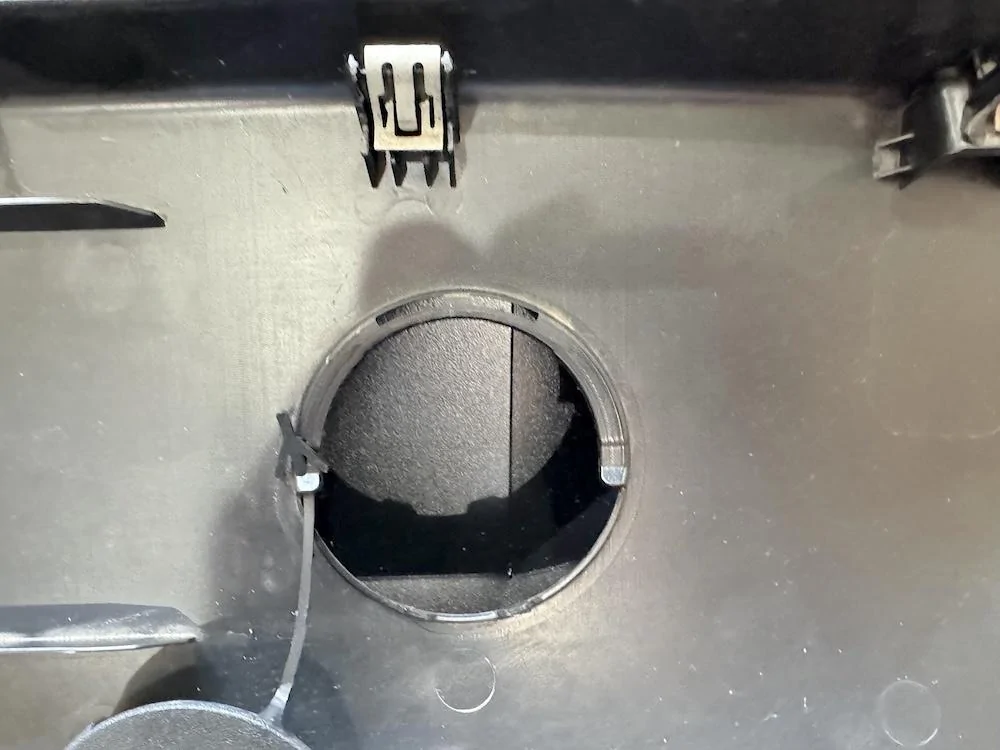
R1T version - no jack point access to the back without removing the last panel.
Rivian R1T R1S EVSportline Aero Covers arrived...questions/thoughts oqRP2xR


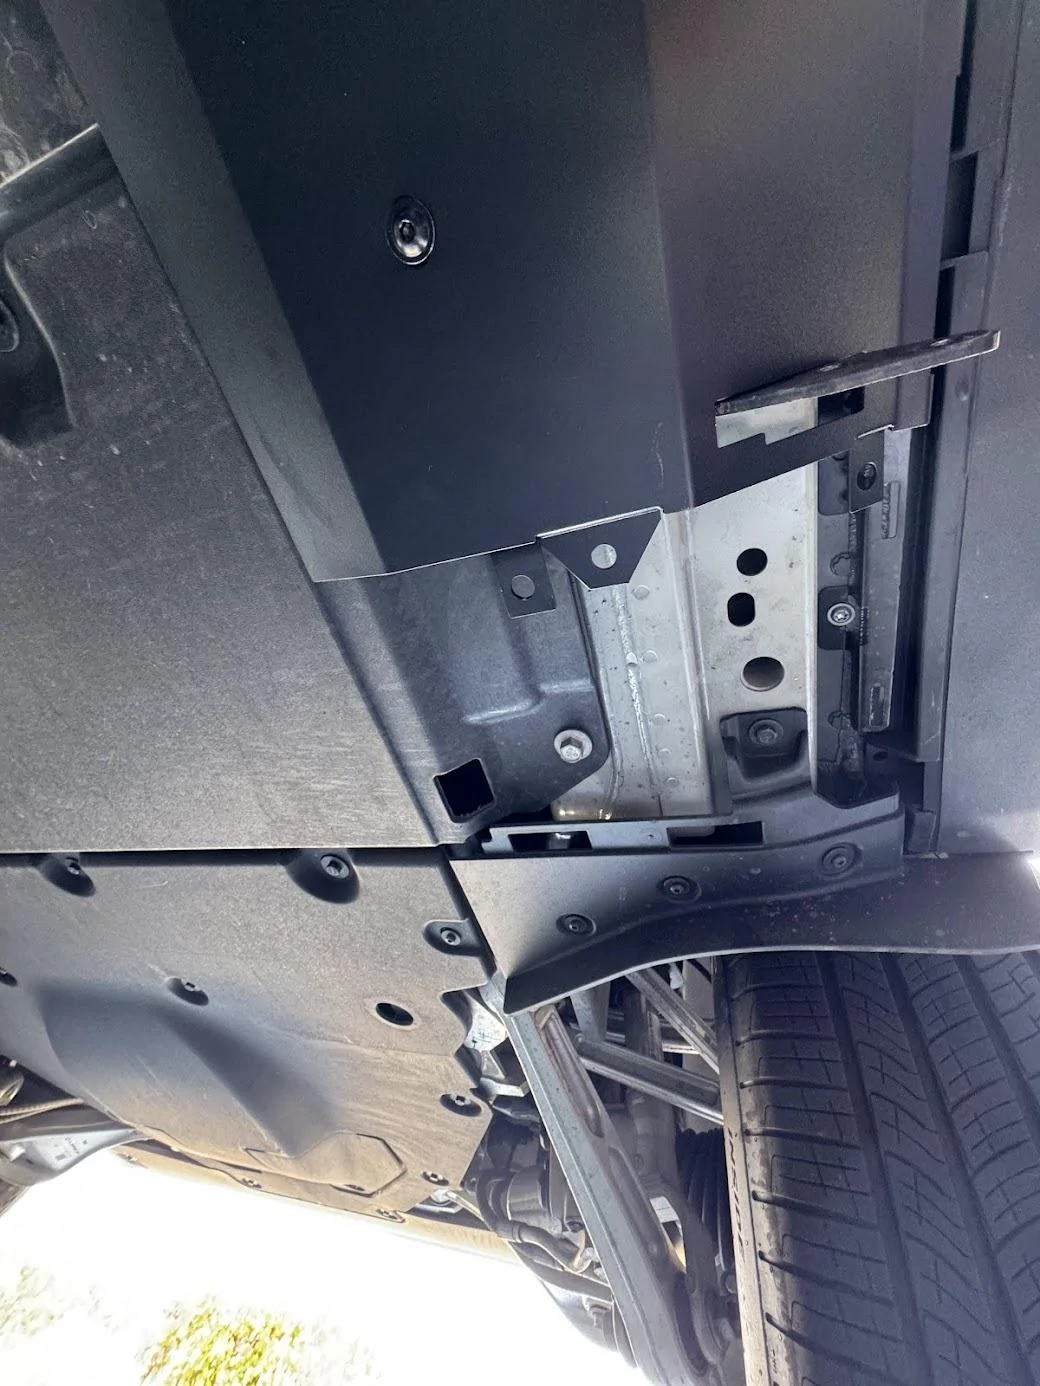
Instructions from the website showing panel removal required to access jack point.
Rivian R1T R1S EVSportline Aero Covers arrived...questions/thoughts bZ4Hz4r
Sponsored


doit82

Well-Known Member
Joined
Jul 12, 2022
Threads
11
Messages
509
Reaction score
501
Location
Vermont
Vehicles
Model Y, R1T
Thanks for pointing that out. I have these but have not yet installed and I did not notice this. Definitely would be better to have a cut out there like the front.
 

BrayBay

Well-Known Member
First Name
Paul
Joined
Aug 22, 2021
Threads
29
Messages
339
Reaction score
625
Location
Texas
Vehicles
Launch Edition R1S - Forest Green/Forest Edge
Clubs
 
I'm having buyer's remorse as well. Received mine for R1S, but haven't installed them yet. I can confirm that the rear R1S panel has a hatch to access the jack point.

I'm thinking about not having that rear panel as well. Such an odd design for that hatch instead of having a cut out like the front. I guess it's not a big deal to carry yet another bit around, but I would have rather had a normal pop out. I can also see this rear panel being a bother to any technician because they have to perform another step to lift the vehicle. I'm considering to go bare underneath.

Rumors say Rivian is working on a running board. Hopefully it's compatible with the original plastic panels.

Finally, I really hated that clip system.
 
OP
OP
ElGuano

ElGuano

Well-Known Member
Joined
Oct 9, 2024
Threads
49
Messages
866
Reaction score
1,236
Location
Cali
Vehicles
R1T Trimax - Storm Blue, Driftwood, Sport Dark
I'm having buyer's remorse as well. Received mine for R1S, but haven't installed them yet. I can confirm that the rear R1S panel has a hatch to access the jack point.
Does the hatch have a removable cover? If so, you could just leave the cover off entirely, you'd have a small hole, simila if you took out the jackpuck cover on the OEM covers. But you could even just duct-tape over it. That way you don't have to worry about not having a necessary tool in a pinch, which is my main concern.
 

BrayBay

Well-Known Member
First Name
Paul
Joined
Aug 22, 2021
Threads
29
Messages
339
Reaction score
625
Location
Texas
Vehicles
Launch Edition R1S - Forest Green/Forest Edge
Clubs
 
Does the hatch have a removable cover? If so, you could just leave the cover off entirely, you'd have a small hole, simila if you took out the jackpuck cover on the OEM covers. But you could even just duct-tape over it. That way you don't have to worry about not having a necessary tool in a pinch, which is my main concern.
Oh yes, that plate is a completely separate aluminum piece. Good suggestion, I'll see how that works out!

... unfortunately that doesn't change the situation with the R1T.
 

Sponsored

MonumentalRiv

Active Member
Joined
Jan 15, 2025
Threads
1
Messages
30
Reaction score
105
Location
Washington, DC
Vehicles
R1S
I have them for the R1S. I was one of the first to receive them- even before the installation instructions came out and I had to figure it out on my own.

I really like these covers- sturdier than the plastic clip on OEM stuff they're replacing but also lightweight.

Regarding the rear puck jack access - yeah it's not an ideal design situation. I think they did that because the rear of these cars requires higher jackpoints than the front. So you can't have the same small access point as the front - the design actually gives you greater flexibility for jacking up your car if you need to do so.

My overall thought is that year- having to take off a panel sucks. But if you have a flat tire, removing three screws is an additional 2 minutes in already longer process- so it's not really a massive undertaking in the grand scheme of things.
 
OP
OP
ElGuano

ElGuano

Well-Known Member
Joined
Oct 9, 2024
Threads
49
Messages
866
Reaction score
1,236
Location
Cali
Vehicles
R1T Trimax - Storm Blue, Driftwood, Sport Dark
I decided to install them, but leave off the last panel (which is very small). The good news is that's an option. Each panel has connection points to bolt to both the previous/next panel, AND the frame of the truck. So leaving the trailing panel off shouldn't make for a weak connection.

It....was more work than I was expecting. I have already installed the running boards, so my installation included removing the boards from the carriage bolts. It took about 3.5 hours for the driver side side, and I'm exhausted. I'll do the other side some other time.

The instructions....are not great. From the site, they look temporary, and I wouldn't be surprised if EVSportline revamped them a bit. It's VERY confusing trying to figure things out, and I almost think you're better off if you just use the instructions to see how the clip-nuts go, and then figure out the brackets and panels yourself. One thing that is confusing is that it's that they cover Gen1 and Gen2 together; they try to call out the differences but it gets very confusing, fast. Especially with which direction is front, if they're showing driver or passenger side, etc.

Here are a few things that took the most time.

1. There are different-sized bolts not mentioned in the instructions. Most bracket-to-frame bolts are 17mm, but there is one 13mm bolt at the back. The instructions do mention to torque this one less (25 ft-lb rather than 45 ft-lb) but they never say why. It's because it's a different bolt.

2. The finish on each piece is excellent. The brake pressing is precise, the powder coating is smooth. The fit between pieces is VERY precise. The instructions frequently mention there may be acceptable gaps, but I had zero gaps, and I had to loosen everything a few times to adjust everything so that there was enough free space at the last panel.

3. The hardest part, by far, was getting the running boards back on and the carriage bolts re-installed. There is not a lot of free space left by the cutouts in the aero covers, and I actually had to use my bottle jack to jack up the truck at the panels in order to bend/warp the panels enough for the upper carriage bolts to fit. When I install the passenger side, I will probably try to thread the carriage bolts back in first before tightening the aero covers down.

4. You can't torque-wrench the upper carriage bolts to spec anymore. The aero covers have so little clearance that a socket won't fit, you have to use a crescent and just crank it down tight.

5. It's a lot easier to wrench down the top carriage bolts if you do it before installing the bottom bolts. You have about 30 degrees of rotation between the covers and the bottom carriage bolts. So remove the bottom bolts, crank down the top bolts as tight as you can, and then install the bottom bolts and torque to 35ft-lbs.

This is the only 13mm frame bolt needed for the brackets, the rest are 17mm.
Rivian R1T R1S EVSportline Aero Covers arrived...questions/thoughts gYasuC5


Here is the rear panel I left off. It's tiny, I won't miss it:
Rivian R1T R1S EVSportline Aero Covers arrived...questions/thoughts TYfczLT


Here's the back with the jack puck attached:
Rivian R1T R1S EVSportline Aero Covers arrived...questions/thoughts oN50T4t


Here is the front panel, with jack puck attached to verify fit:
Rivian R1T R1S EVSportline Aero Covers arrived...questions/thoughts lhfWriJ


Who needs jack points? Here I am jacking up the truck on the covers, pushing the angled edge of the aero frame up:
Rivian R1T R1S EVSportline Aero Covers arrived...questions/thoughts P3CwCeu


Why slightly bend the aero frame with the jack? There isn't much clearance for the head of these carriage bolts.
Rivian R1T R1S EVSportline Aero Covers arrived...questions/thoughts 8JCgoUF


Here I've removed the bottom carriage bolt so I have enough space to torque down the top one first:
Rivian R1T R1S EVSportline Aero Covers arrived...questions/thoughts ats0NEm


Any questions? Did I screw something up something major/obvious?
 

BrayBay

Well-Known Member
First Name
Paul
Joined
Aug 22, 2021
Threads
29
Messages
339
Reaction score
625
Location
Texas
Vehicles
Launch Edition R1S - Forest Green/Forest Edge
Clubs
 
Great write up. Got mine on and wanted to share what you're suggestion of leaving the access panel looks like:
Rivian R1T R1S EVSportline Aero Covers arrived...questions/thoughts 1000015377


I think I'll keep it that way. I agree with pretty much everything you said. The instructions are terrible and I also ran into a roadblock getting the running boards on due to interference with the carriage bolts. Called it quits for now.

Looks nice though, but I'm questioning whether it was worth the money and trouble.
 
OP
OP
ElGuano

ElGuano

Well-Known Member
Joined
Oct 9, 2024
Threads
49
Messages
866
Reaction score
1,236
Location
Cali
Vehicles
R1T Trimax - Storm Blue, Driftwood, Sport Dark
Great write up. Got mine on and wanted to share what you're suggestion of leaving the access panel looks like:
1000015377.jpg


I think I'll keep it that way. I agree with pretty much everything you said. The instructions are terrible and I also ran into a roadblock getting the running boards on due to interference with the carriage bolts. Called it quits for now.

Looks nice though, but I'm questioning whether it was worth the money and trouble.
Thanks, and I really prefer what they were able to do with the R1S over the R1T. If you can find a wing nut or thumbscrew/knob, I reckon you can run with the panel installed, and still have easy tool-less access as needed. It's threaded for 8mm x 1.25 in case.
 

BrayBay

Well-Known Member
First Name
Paul
Joined
Aug 22, 2021
Threads
29
Messages
339
Reaction score
625
Location
Texas
Vehicles
Launch Edition R1S - Forest Green/Forest Edge
Clubs
 
EDIT: See the EV Sport line response with regard to instruction updates. This post was made prior to the updated instructions.

Final update, I decided to take out the aluminum aero panels and just go bare underside. The installation experience of these aero panels was just too much trouble than it's worth. For anyone reading this in the future, skip the aero panels. Go bare or cut the plastic panels.

Here are my issues with the aero panels:
  • As mentioned, the instructions are terrible. A lot of cross checking and double checking. The photographs on the website don't really help, and there's no video instructions so far.
  • The clip nut is cumbersome. If you mess up one and accidentally put it in the wrong orientation (see terrible instructions above) its takes some effort to release it.
  • The strange design choice to have an hex screw access panel for the rear jack point (and not having any access for R1T) instead of a tool less method to get to the jack pucks.
  • As experienced by @ElGuano , the clearances for the carriage bolts used by the running boards are not sufficient. I also had to push up against and bend my aero panels to get the bolts through the mounting holes.
  • Even after getting the carriage bolts through, trying to get the nut on and tightened to spec was yet another puzzle to solve.
Overall, EV Sportline/Team 1EV needs to go back to the drawing board for this one. Could be user error on my part too, but I'm not spending another Texas summer day to try and figure it out.

Unfortunately I may have to scrap these and take the financial hit. I don't think panels are even in good shape to even give away at this point.

The RMaxx Running Board install was smooth comparatively speaking. That is definitely a good product, and makes entry and exit a lot easier.
 
Last edited:

Sponsored

swflor

Well-Known Member
First Name
Scott
Joined
Dec 23, 2022
Threads
17
Messages
359
Reaction score
572
Location
NC
Vehicles
R1T
Occupation
Executive
Clubs
 
I installed my first set of R1T aero last week. I was surprised by no rear jack puck hole. Doesn’t exactly make sense. Why not give a hole?

I’m considering drilling an access hole and then putting a grommet in it, but this is what I was trying to accomplish by getting these as an option…clean underbelly.

For the S, I also noticed the access hatch…again, seems odd. Will play with that also.
 
OP
OP
ElGuano

ElGuano

Well-Known Member
Joined
Oct 9, 2024
Threads
49
Messages
866
Reaction score
1,236
Location
Cali
Vehicles
R1T Trimax - Storm Blue, Driftwood, Sport Dark
I installed my first set of R1T aero last week. I was surprised by no rear jack puck hole. Doesn’t exactly make sense. Why not give a hole?
I think I know why. The area where the rear jackpoint would sit is at the intersection of the most complex multi-point bend/joint/weld:

Rivian R1T R1S EVSportline Aero Covers arrived...questions/thoughts F8E42uv


Rivian R1T R1S EVSportline Aero Covers arrived...questions/thoughts zqfvPUT


I don't want to discount that having flat aluminum sheet and keeping the area low profile isn't easy. But it's unfortunate they couldn't come up with a design that could have preserved a hole for the jack point.
 

swflor

Well-Known Member
First Name
Scott
Joined
Dec 23, 2022
Threads
17
Messages
359
Reaction score
572
Location
NC
Vehicles
R1T
Occupation
Executive
Clubs
 
I think I know why. The area where the rear jackpoint would sit is at the intersection of the most complex multi-point bend/joint/weld:

F8E42uv.jpg


zqfvPUT.jpg


I don't want to discount that having flat aluminum sheet and keeping the area low profile isn't easy. But it's unfortunate they couldn't come up with a design that could have preserved a hole for the jack point.
Fair point. I did not lay them out side by side like that yet.

I feel like maybe at they kept the plate flat…even if the my needed a hard 90 to bring it back in, it would have been better to keep the jack point. The SCs aren’t going to take this off or will charge you and not put it back.

At least a small hard 90 aerodynamically would let be an issue going forward. High speed reverse you may suck some kwh. 🤣

I still may cut a hole, then put a flexible rubber grommet in. Will keep thread posted if I do that.
 

EV Sportline

Well-Known Member
Site Sponsor
Joined
May 31, 2022
Threads
114
Messages
1,875
Reaction score
3,828
Location
Los Angeles
Website
evsportline.com
Vehicles
Rivian R1T, R2 res, Tesla S, 3, X, Y, Cybertruck
Occupation
Upgrading Electric Vehicles
Clubs
 
Gang,

As usually, appreciate the feedback!

Couple things to share:

1 - Instructions have been improved / updated (loading now, be live in a few mins)! We will shoot a video (next few days) as well, to give even more help.

2 - Regarding the rear spot; we face limitations because the jack location is directly where the angle panels converge and are welded together. So....dropping a hole / plug is not reasonable viable in that exact spot, thus the access panel solution. And as 'aero' panels, we're working to maintain the 'aero', so messing with that angled section and not messing up the aero is a consideration.

3 -We had a flat surface to install a plug in the front, but since that was not possible in the rear due to the location of the jack point relative to the necessary panel bends, we had to pivot to the next best option. Remove a plug vs remove a small panel?....whelp, I didn't think people had a love for plugs over panels ha ha, but i see that some feel strongly. That's fair, but I actually prefer the panel removal because you can see the jack puck hole easily; anything to make jacking easier / safer is good by me, since It's hard to see any of this stuff for most folks, when they are on their knees. So...small panel removal and preserve the 'shape', was okay to me. Removing this little panel is easy / fast.

4 - Clearances / tight fits. Okay, pro-tip, keep all the button head panel bolts loose while anchoring and tightening the running board brackets. This will make things much easier and allow panels to shift around for clearing tools and bolts. And we added this tip to the update instructions! Once the boards/brackets are tight, you can center up the covers...THEN tighten the cover bolts. Keep in mind, we didn't want sloppy-wide clearances around brackets, as we're serving the customer base that went to extremes to 'tape' and 'seal' the slightest of gaps, cracks, and edges around brackets -- so tight is good!

And as usual, we're here to serve customers and happiness - so it you bought them, and after reading this and getting our help (contact me if you need more personalized help -- happy to spend the time with you), and you want to return them -- no problem! We want happy customers, like we always have 👍🏻 That's my promise.

Thanks everyone -
Team EV Sportline
 

NeedSumCoffee

Well-Known Member
First Name
James
Joined
May 23, 2024
Threads
4
Messages
338
Reaction score
650
Location
US
Vehicles
R1S
Really like EV Sportline running boards but I just don’t see the purpose of the aero covers. One of the single top selling features of the EV Sportline running board is that they dont interfere with stock jack locations.... then they come out with aero covers that covers that stock jack locations.

You end up paying $400 for reduced functionality over the free oem plastic covers. I dont see why people dont simply cut a small hole in the stock plastic covers and use them.
Sponsored


Top