Sponsored

Gen 2 12 volts for the dash and/or frunk

Joules Burn

Well-Known Member
First Name
Morris
Joined
Nov 7, 2023
Threads
16
Messages
363
Reaction score
811
Location
California
Vehicles
2026 R1S, 2022 Kia EV6 GT-L FE
Occupation
Retired Electronics
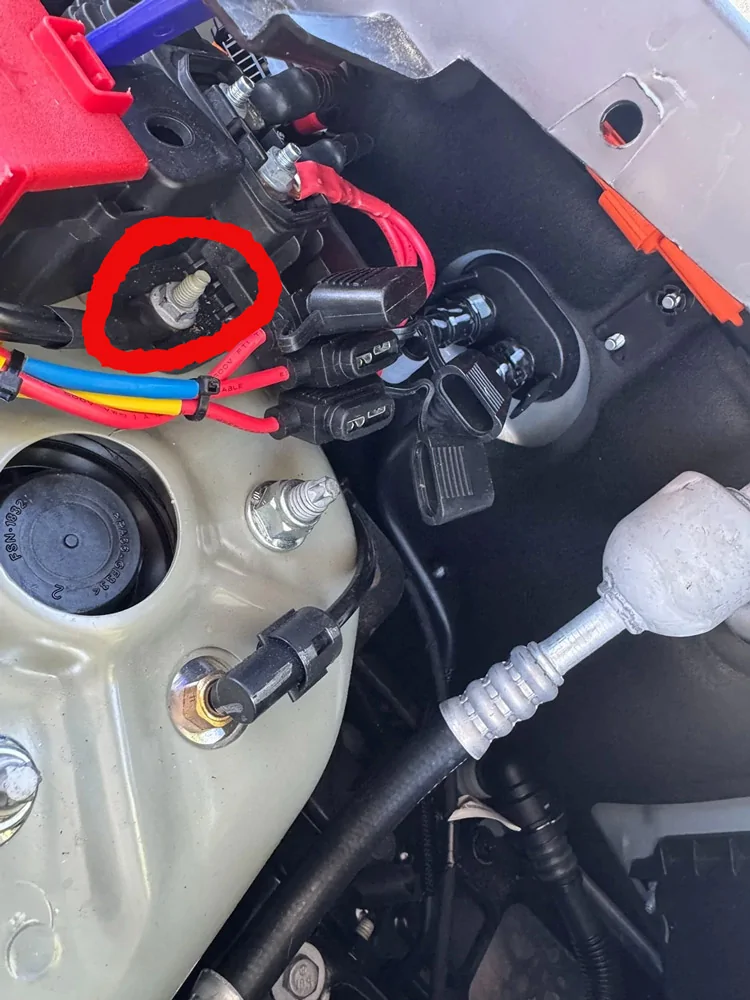
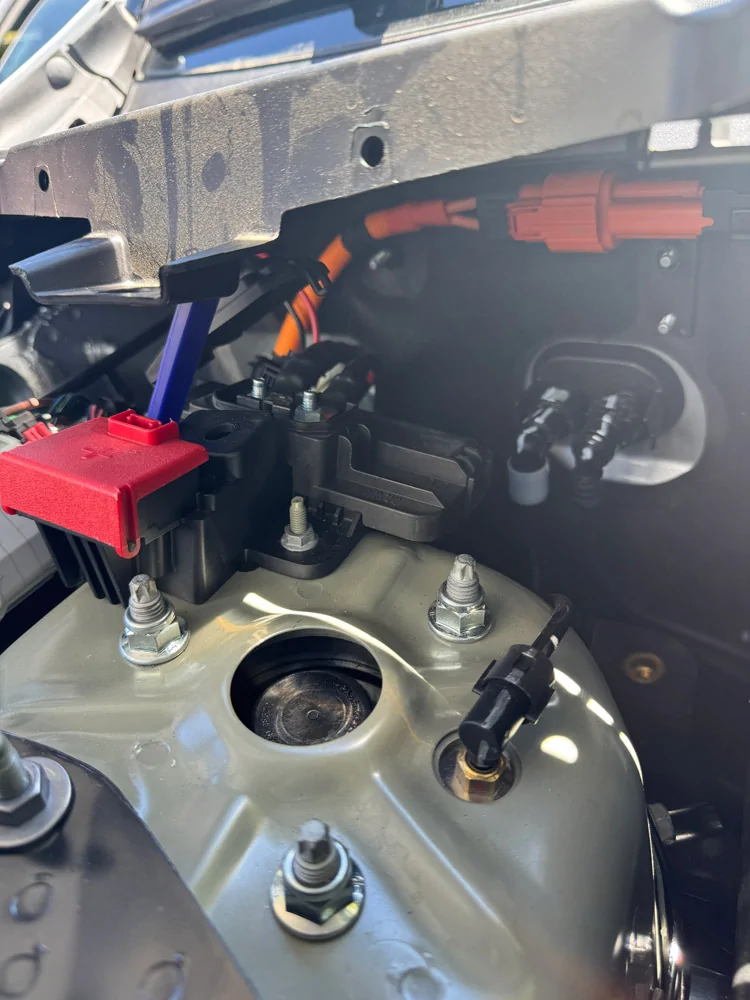
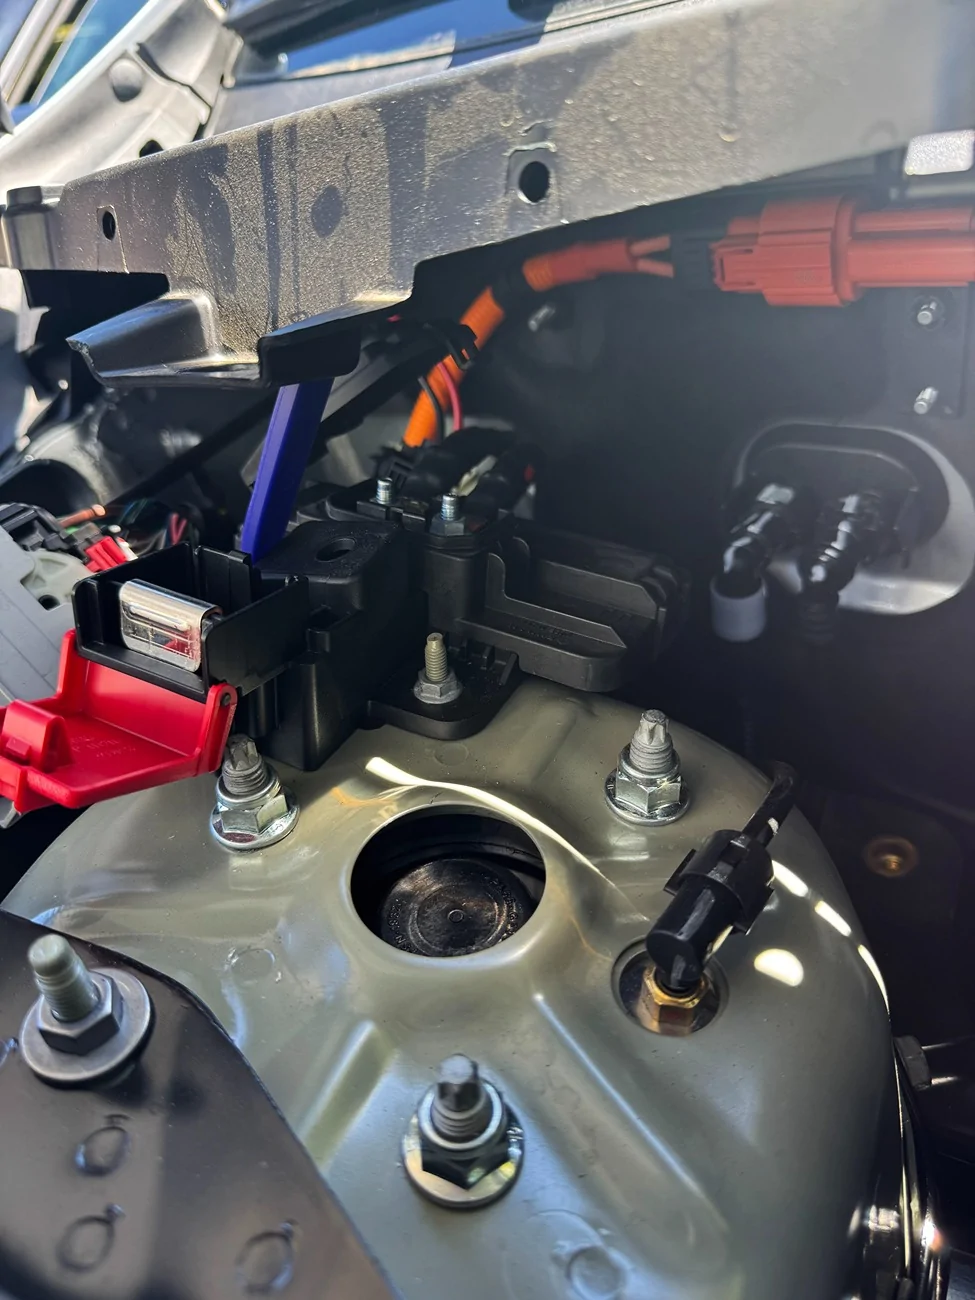
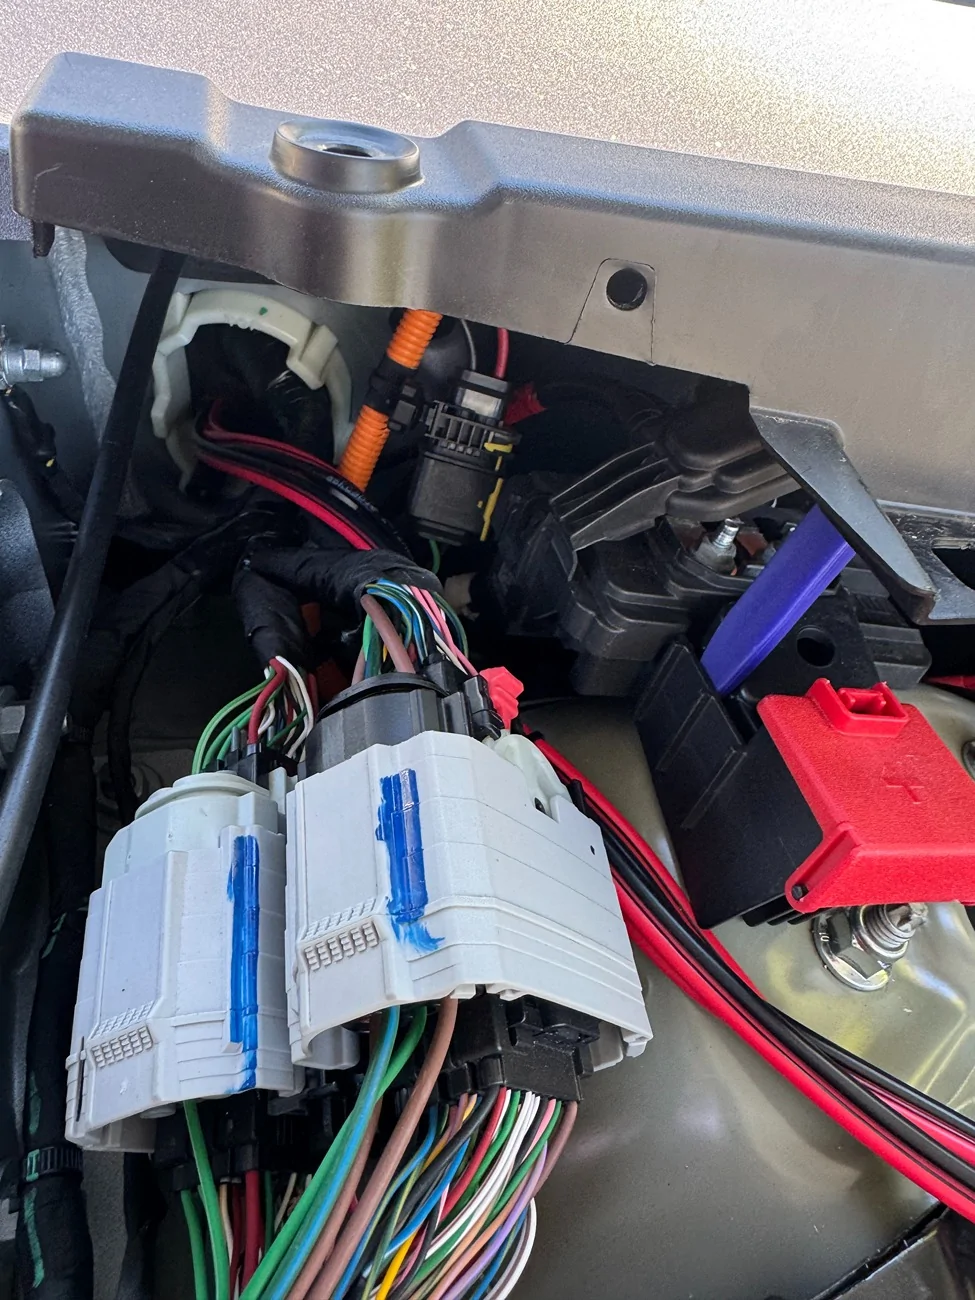
Some things are not in the manual. Under the front cover for the windshield wipers is a 12 volt connector suitable for jump start cables or trickle charger. With close access to the firewall you don’t have to unbolt the passenger seat for 12 volt connections.

Rivian R1T R1S Gen 2 12 volts for the dash and/or frunk 1756962897280-93


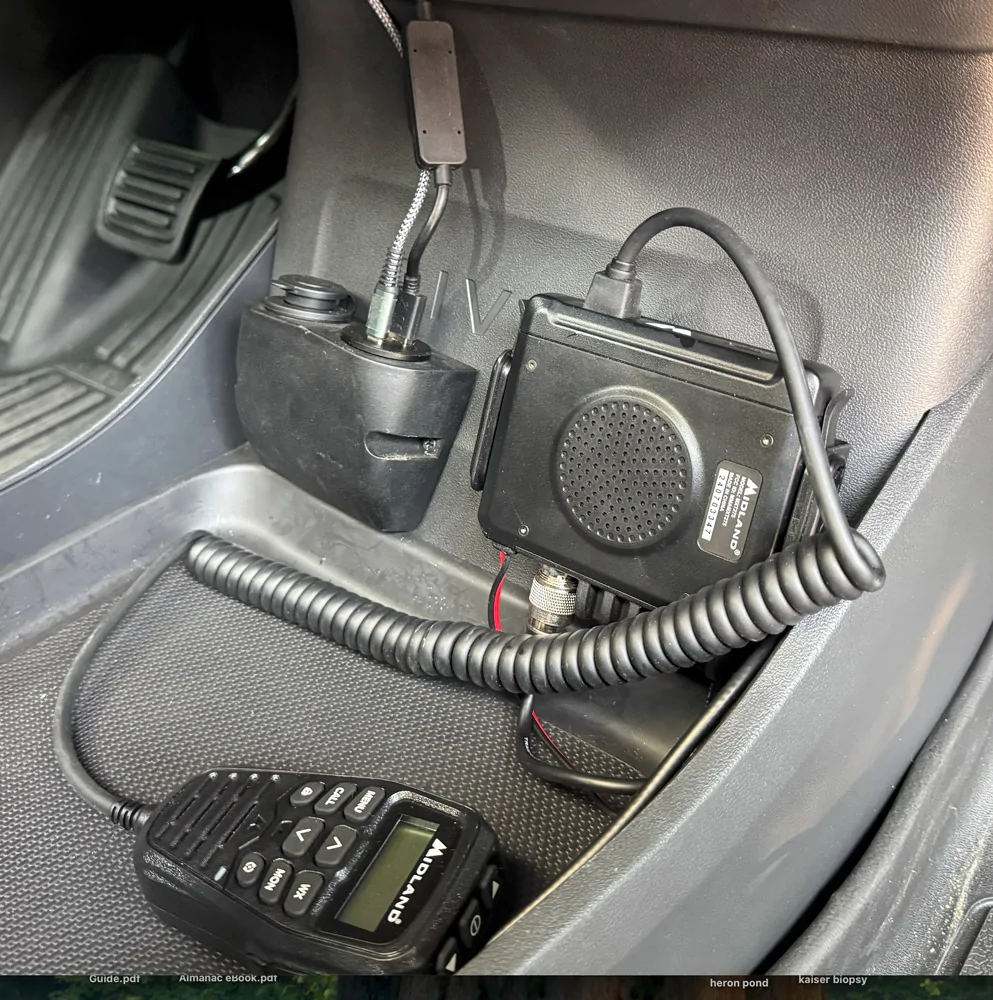
Phone, GPS, Thinkware camera, CarPlay stuff, communications for HAM, CB, GSMR, whatever - source is yours.

Rivian R1T R1S Gen 2 12 volts for the dash and/or frunk 1756963003375-7a


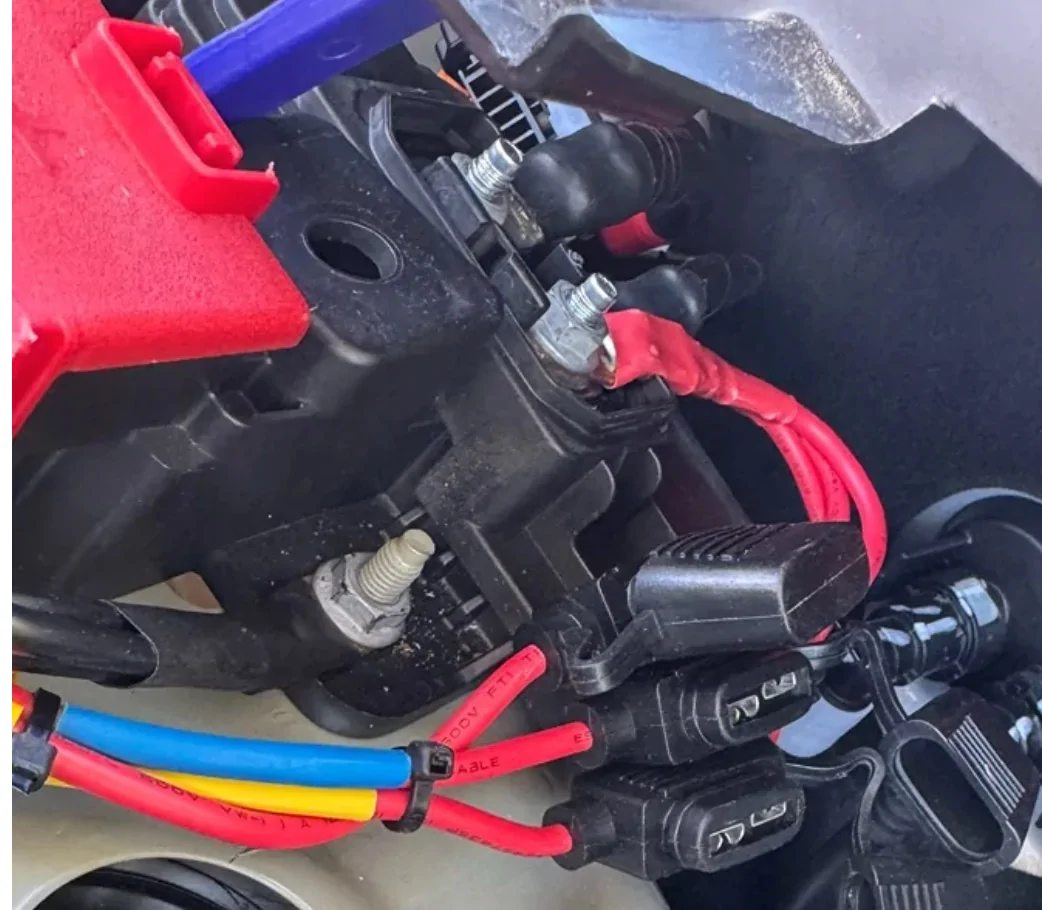
This mounting point has some hefty cables with a 10mm nut, maybe 6 AWG, to this connection point with a “port” that is subtle for a jumpstart or charger clamp.

Rivian R1T R1S Gen 2 12 volts for the dash and/or frunk 1756963076905-z0


(Factory convenient? Not for the masses? I checked 2026 manual. I could not find it in my version.)

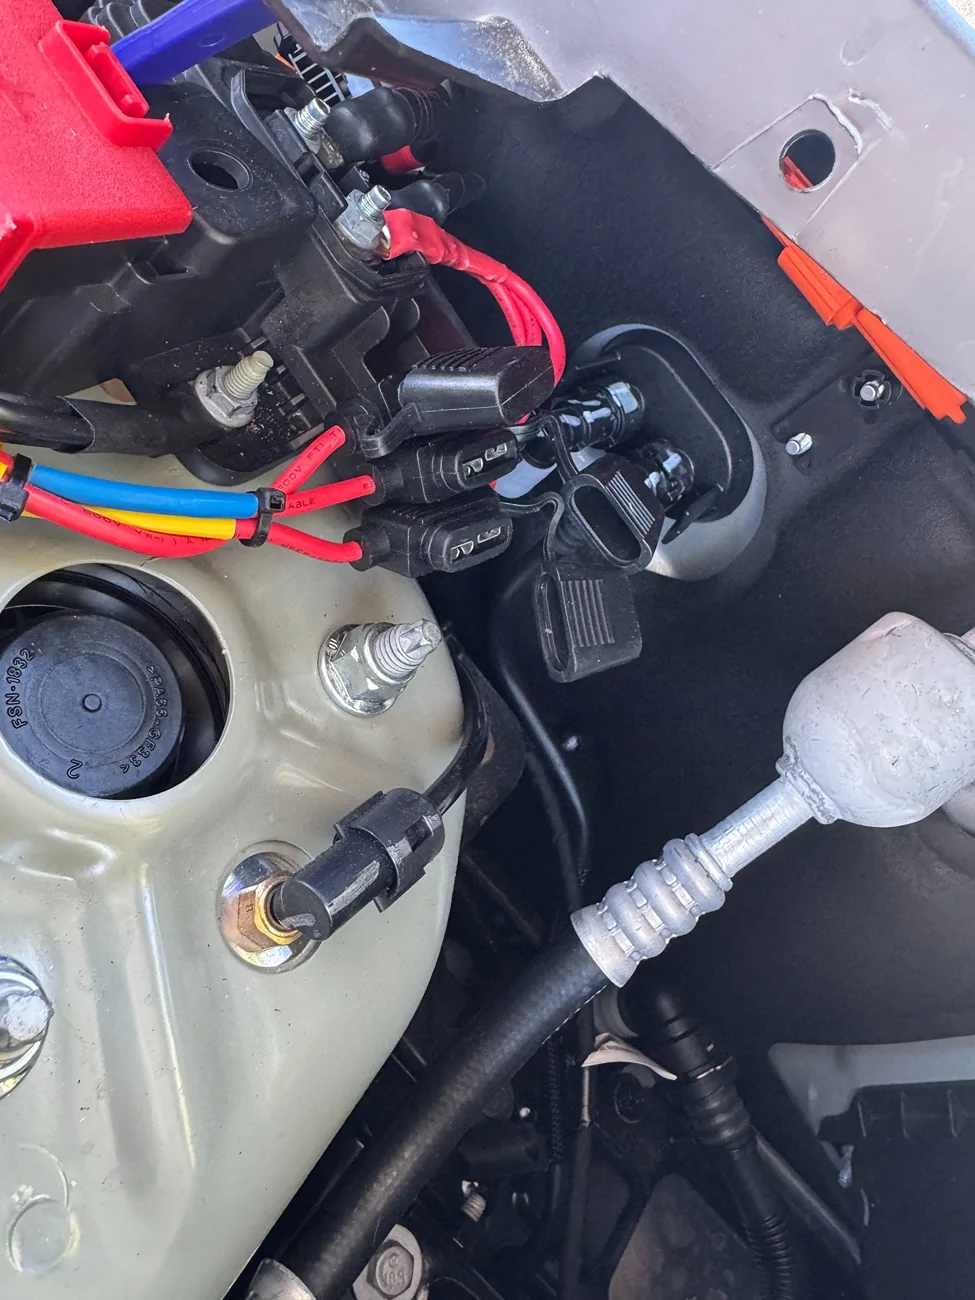
I routed some 12 AWG fused pairs for two ports, 12 volt cig/USB and low amp hardwire - and one designated for communications radio.

Rivian R1T R1S Gen 2 12 volts for the dash and/or frunk 1756963566265-5a


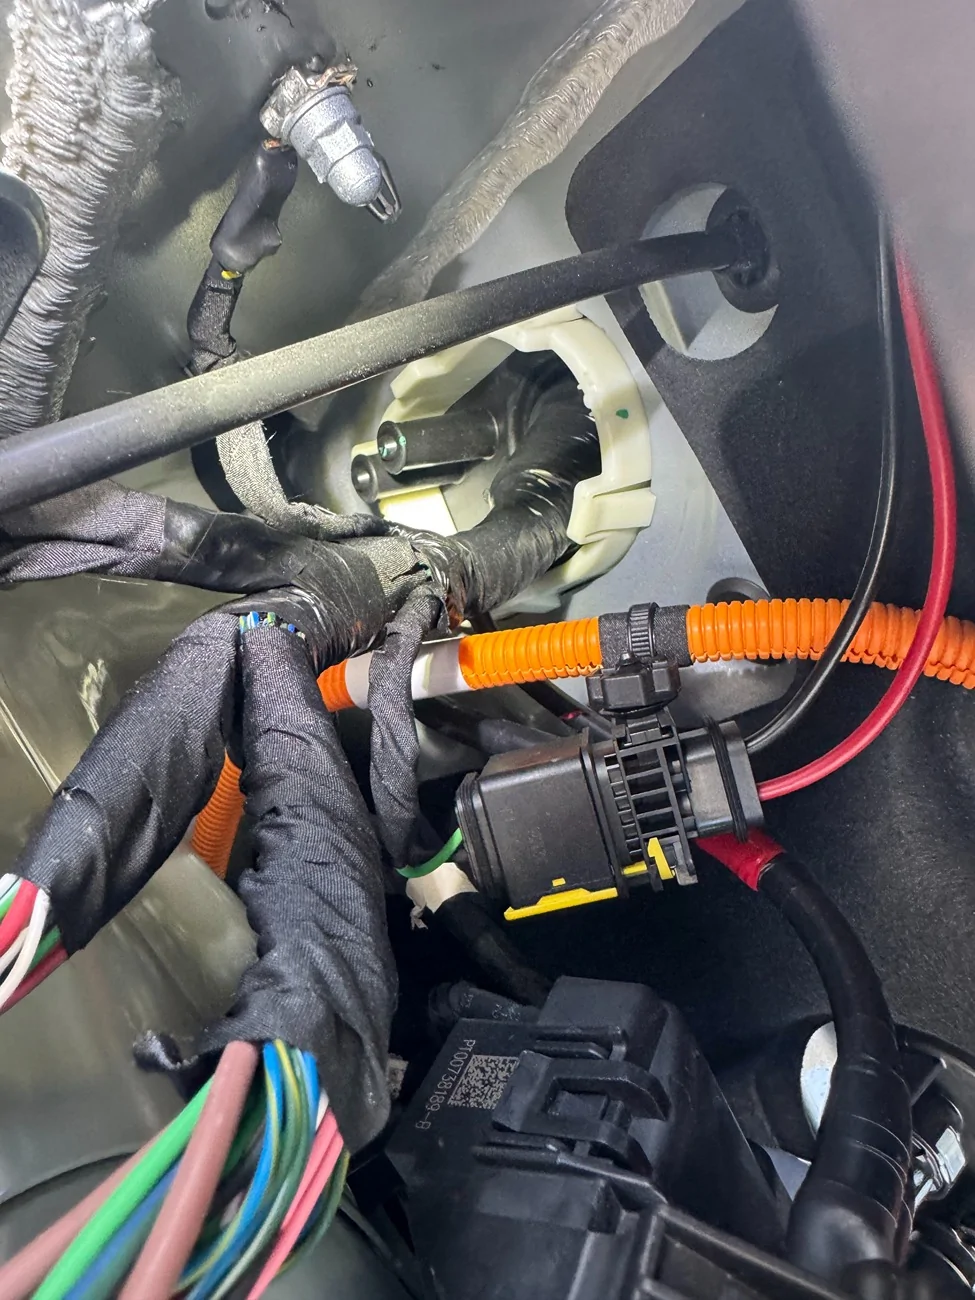
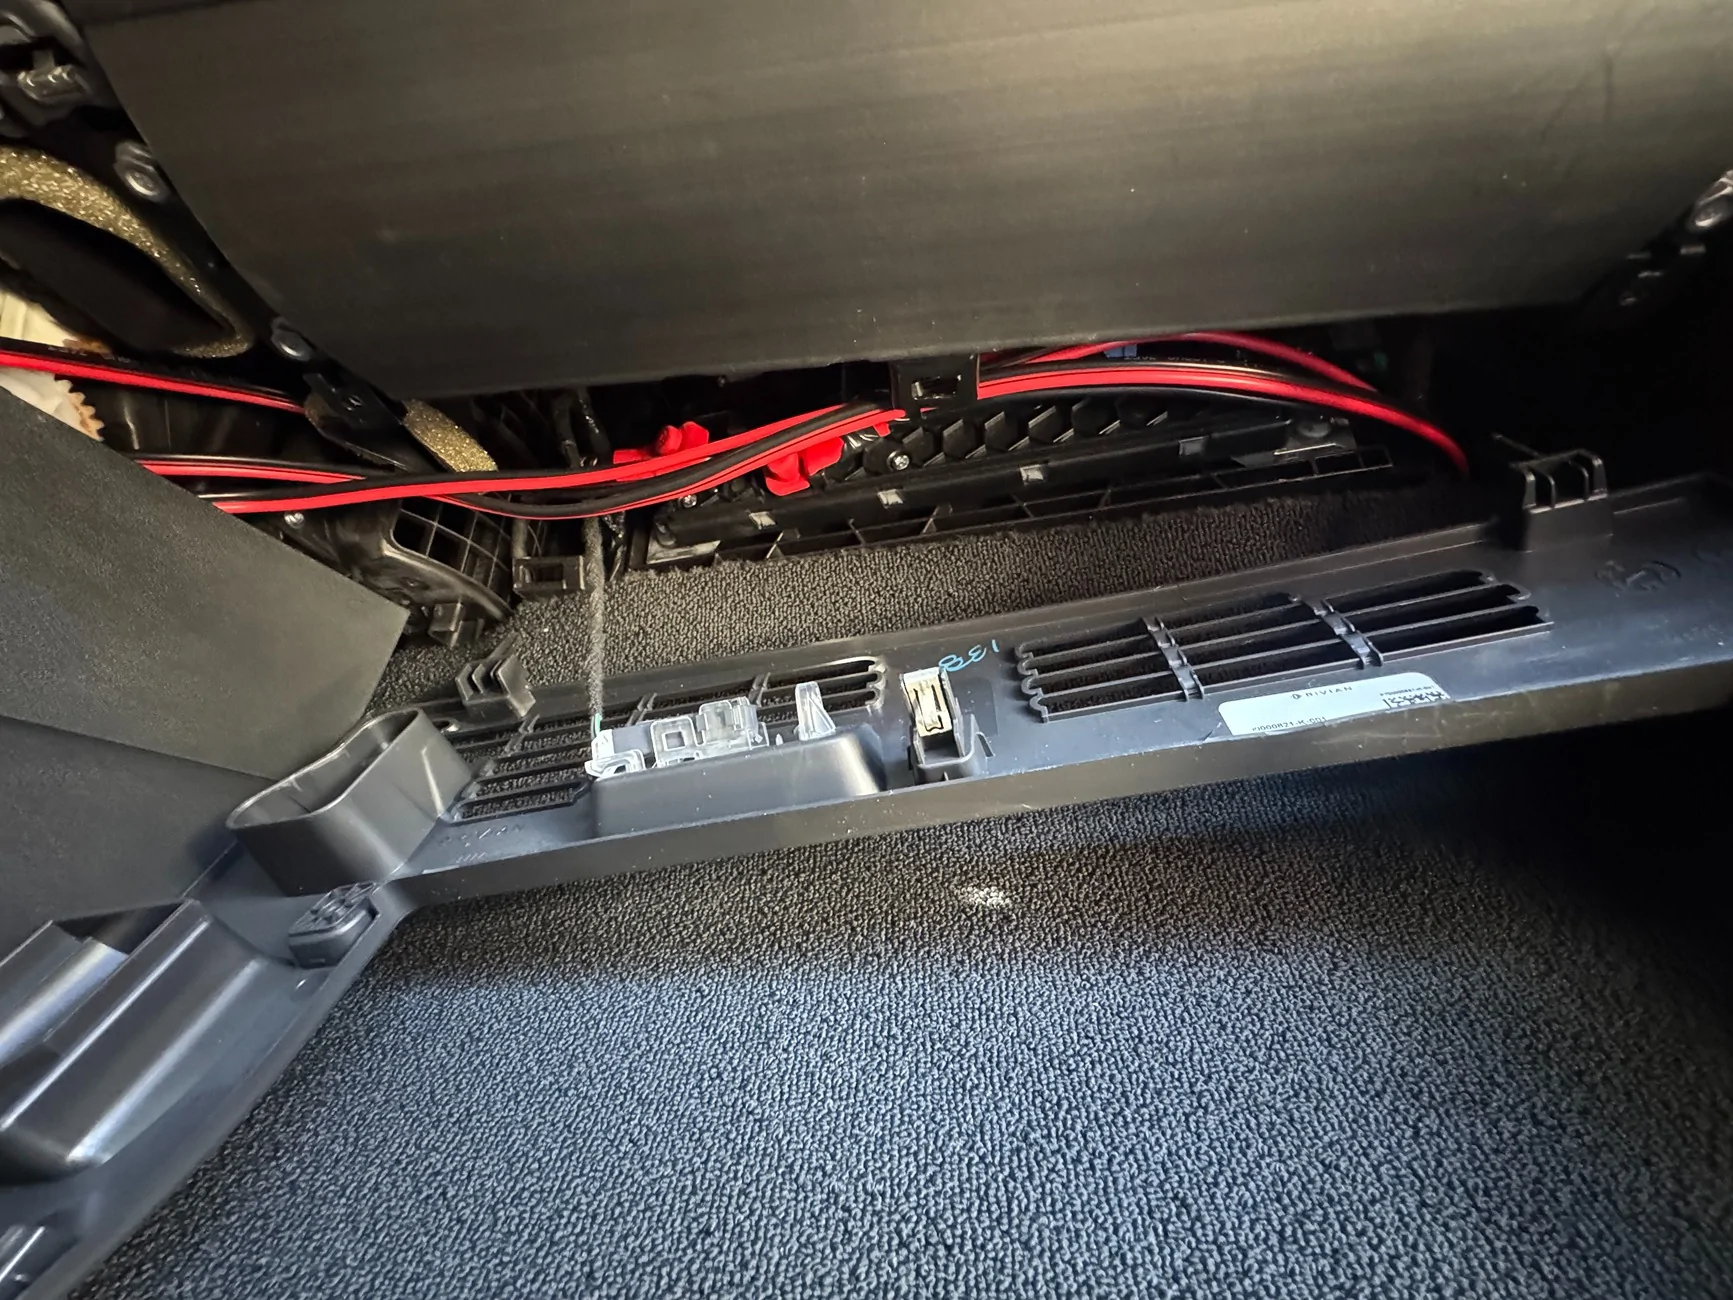
There are two rubber nipples that are located by the passenger firewall. REALLY good rubber that will require a sharp knife for access - something in the consistency of a MOHS equivalent of overcooked calamari.


Rivian R1T R1S Gen 2 12 volts for the dash and/or frunk 1756963866264-1q


Two 25 torx screws to remove the panel where the fuse box used to be in the old days.

Rivian R1T R1S Gen 2 12 volts for the dash and/or frunk 1756963968692-a


(The concept of “virtual fuses” is in another information orbit. Analog to Digital to Virtual to Conceptual = Ohms law on drugs.)

The output is easy to the central counsel. Remove the bottom pad and use a plastic panel lifter to remove the Rivian plastic plate.


Rivian R1T R1S Gen 2 12 volts for the dash and/or frunk 1756964619279-h5


Rivian R1T R1S Gen 2 12 volts for the dash and/or frunk 1756963519246-f


Rivian R1T R1S Gen 2 12 volts for the dash and/or frunk 1756963649409-ks
Sponsored


petemill

Active Member
First Name
Pete
Joined
Apr 4, 2022
Threads
1
Messages
38
Reaction score
32
Location
CA
Vehicles
Rivian R1S, Telsa Model Y, prev: F150 Lightning, F150 Powerboost
Occupation
software
Clubs
 
Nice work. Did you find a 12v source that is only powered when the vehicle is "on"?
 
OP
OP
Joules Burn

Joules Burn

Well-Known Member
First Name
Morris
Joined
Nov 7, 2023
Threads
16
Messages
363
Reaction score
811
Location
California
Vehicles
2026 R1S, 2022 Kia EV6 GT-L FE
Occupation
Retired Electronics
Nice work. Did you find a 12v source that is only powered when the vehicle is "on"?
It's a direct connection to the battery for charging purposes so it is always "on".
 

kudrak

New Member
First Name
Mike
Joined
Aug 26, 2025
Threads
0
Messages
1
Reaction score
1
Location
CT
Vehicles
R1S
This is awesome. I was looking to do something extremely similar for a gmrs (I am looking into it) and a cb radio.
Did you run multiple wires through one nipple?
Where did you find a ground/negative?
 

Sponsored

OP
OP
Joules Burn

Joules Burn

Well-Known Member
First Name
Morris
Joined
Nov 7, 2023
Threads
16
Messages
363
Reaction score
811
Location
California
Vehicles
2026 R1S, 2022 Kia EV6 GT-L FE
Occupation
Retired Electronics
This is awesome. I was looking to do something extremely similar for a gmrs (I am looking into it) and a cb radio.
Did you run multiple wires through one nipple?
Where did you find a ground/negative?
I got three pair of 12 AWG wires through the nipple without a problem. The ground was at the base of the 12 volt assembly.

Rivian R1T R1S Gen 2 12 volts for the dash and/or frunk ground
 
First Name
David
Joined
Oct 7, 2025
Threads
0
Messages
15
Reaction score
5
Location
Mukilteo, WA
Vehicles
2026 Rivian R1S Dual Max Performance
Occupation
Structural Engineer
Clubs
 
Following for future GMRS radio install in 2026 RiS Dual Max.
 

Glembi2

Well-Known Member
First Name
Chris
Joined
Dec 3, 2023
Threads
1
Messages
736
Reaction score
818
Location
Vienna, Virginia
Vehicles
R1S, Genesis GV70, Civic
Occupation
Patent attorney
Clubs
 
The real question is: what's your call sign?
My guesses:

Bandit?
Snowman?
Fred?

Definitely not Smokey Bear.

I was thinking the Cannonball Run handles would be good, but the Smokey and the Bandit handles seem more apropo
 
OP
OP
Joules Burn

Joules Burn

Well-Known Member
First Name
Morris
Joined
Nov 7, 2023
Threads
16
Messages
363
Reaction score
811
Location
California
Vehicles
2026 R1S, 2022 Kia EV6 GT-L FE
Occupation
Retired Electronics
My guesses:

Bandit?
Snowman?
Fred?

Definitely not Smokey Bear.

I was thinking the Cannonball Run handles would be good, but the Smokey and the Bandit handles seem more apropo
My FCC designation offers too much TMI.

In my "salad days", I did drive Cannonball in 1973 in an Opel Rally. Had a couple good shots with Brock Yates at the Portofino Inn.

Rivian R1T R1S Gen 2 12 volts for the dash and/or frunk cannonball

Rivian R1T R1S Gen 2 12 volts for the dash and/or frunk opel
 

Sponsored

ttwaiter

Member
First Name
Rich
Joined
Jul 1, 2025
Threads
0
Messages
7
Reaction score
3
Location
seattle
Vehicles
2024 R1S
Thank you for sharing this. Did you have to pull the windshield wipers as outlined in this:


If you are trying to remove the large plastic "front cover" (cowl) spanning the base of the windshield to reach the wiper motor:
  • Remove the wiper arms entirely by unscrewing the 13mm nuts exposed in Step 2.
  • Remove the rubber seal along the top of the cowl.
  • Use a trim tool to disengage the plastic clips along the bottom and sides of the cowl, then slide it away from the windshield.
 
OP
OP
Joules Burn

Joules Burn

Well-Known Member
First Name
Morris
Joined
Nov 7, 2023
Threads
16
Messages
363
Reaction score
811
Location
California
Vehicles
2026 R1S, 2022 Kia EV6 GT-L FE
Occupation
Retired Electronics
Thank you for sharing this. Did you have to pull the windshield wipers as outlined in this:


If you are trying to remove the large plastic "front cover" (cowl) spanning the base of the windshield to reach the wiper motor:
  • Remove the wiper arms entirely by unscrewing the 13mm nuts exposed in Step 2.
  • Remove the rubber seal along the top of the cowl.
  • Use a trim tool to disengage the plastic clips along the bottom and sides of the cowl, then slide it away from the windshield.
On Gen 2, just lift the cover between the wiper cover and the frunk tub. Pops right off. You only need to lift one corner if you want access to battery charging terminal.
 

ttwaiter

Member
First Name
Rich
Joined
Jul 1, 2025
Threads
0
Messages
7
Reaction score
3
Location
seattle
Vehicles
2024 R1S
Thank you for sharing this. Did you have to pull the windshield wipers as outlined in this:


If you are trying to remove the large plastic "front cover" (cowl) spanning the base of the windshield to reach the wiper motor:
  • Remove the wiper arms entirely by unscrewing the 13mm nuts exposed in Step 2.
  • Remove the rubber seal along the top of the cowl.
  • Use a trim tool to disengage the plastic clips along the bottom and sides of the cowl, then slide it away from the windshield.
On Gen 2, just lift the cover between the wiper cover and the frunk tub. Pops right off. You only need to lift one corner if you want access to battery charging terminal.

OK, I did that and I can see it, if you put the truck in service mode, can I assume the power is cut to the 12 V location so I don’t have to worry about shortening it out?

it is Sort of tight between the body and that location, and it’s tough to get a tool in there without creating a short.
 
OP
OP
Joules Burn

Joules Burn

Well-Known Member
First Name
Morris
Joined
Nov 7, 2023
Threads
16
Messages
363
Reaction score
811
Location
California
Vehicles
2026 R1S, 2022 Kia EV6 GT-L FE
Occupation
Retired Electronics
Rivian R1T R1S Gen 2 12 volts for the dash and/or frunk positiv


If we are looking at the same location, there really isn't anything around to short out. I added that connector without sparks or computer brain fart. I used a short ratchet for the nut.

Don't plug in the fuses until your circuits are complete and you'll be fine.
 
Last edited:

ttwaiter

Member
First Name
Rich
Joined
Jul 1, 2025
Threads
0
Messages
7
Reaction score
3
Location
seattle
Vehicles
2024 R1S
OK, I did that and I can see it, if you put the truck in service mode, can I assume the power is cut to the 12 V location so I don’t have to worry about shortening it out?

it is Sort of tight between the body and that location, and it’s tough to get a tool in there without creating a short.

Thank you, Just finnished installing my Extreme LED light bar. I ran the wire down the driver side of the window and routed it around the air cabin filter to get to the point that you highlighted. It's super simple, just connected the ground at the base of the 12 V power and then just added an additional M6 nut on top of the existing nut to get 12V power. The whole thing took 20 minutes to do! This Light bar has a Bluetooth remote, so need to run wire for a switch through the firewall.

This is not a great picture. It's raining outside, but you can see the light bar freshly installed on top of my rack.. No need to see more wire runs as I did as you suggested.

Rivian R1T R1S Gen 2 12 volts for the dash and/or frunk IMG_0355
Sponsored

 
Last edited:


Top